Everything you need to run a clinic or hospital on WordPress — from your first doctor and booking form to multi‑clinic staff, OPD/IPD visits, itemised billing, lab tests, the patient portal, and the drag‑and‑drop page builder. Follow the guides below step by step.
Beginner friendlyReal screenshots for every stepFree & Pro covered
Getting started
Set up in three steps
Install the plugin, tell it which pages to use, and match it to your brand. You only do this once.
1
Install & activate
Free
DocBooker is the free core. DocBooker Pro is an add‑on that unlocks hospital management, payments, the patient portal and the page builder — it needs the free plugin active first.
In WordPress, go to Plugins → Add New, search for “DocBooker”, click Install Now, then Activate.
To unlock Pro, upload doc-booker-pro.zip under Plugins → Add New → Upload Plugin, activate it, then enter your license key when prompted.
A new DocBooker menu appears in your admin sidebar — that’s home base for everything below.
Order matters. Always activate the free DocBooker plugin before DocBooker Pro. Pro extends the free plugin and won’t run on its own.
2
Configure your pages
Free
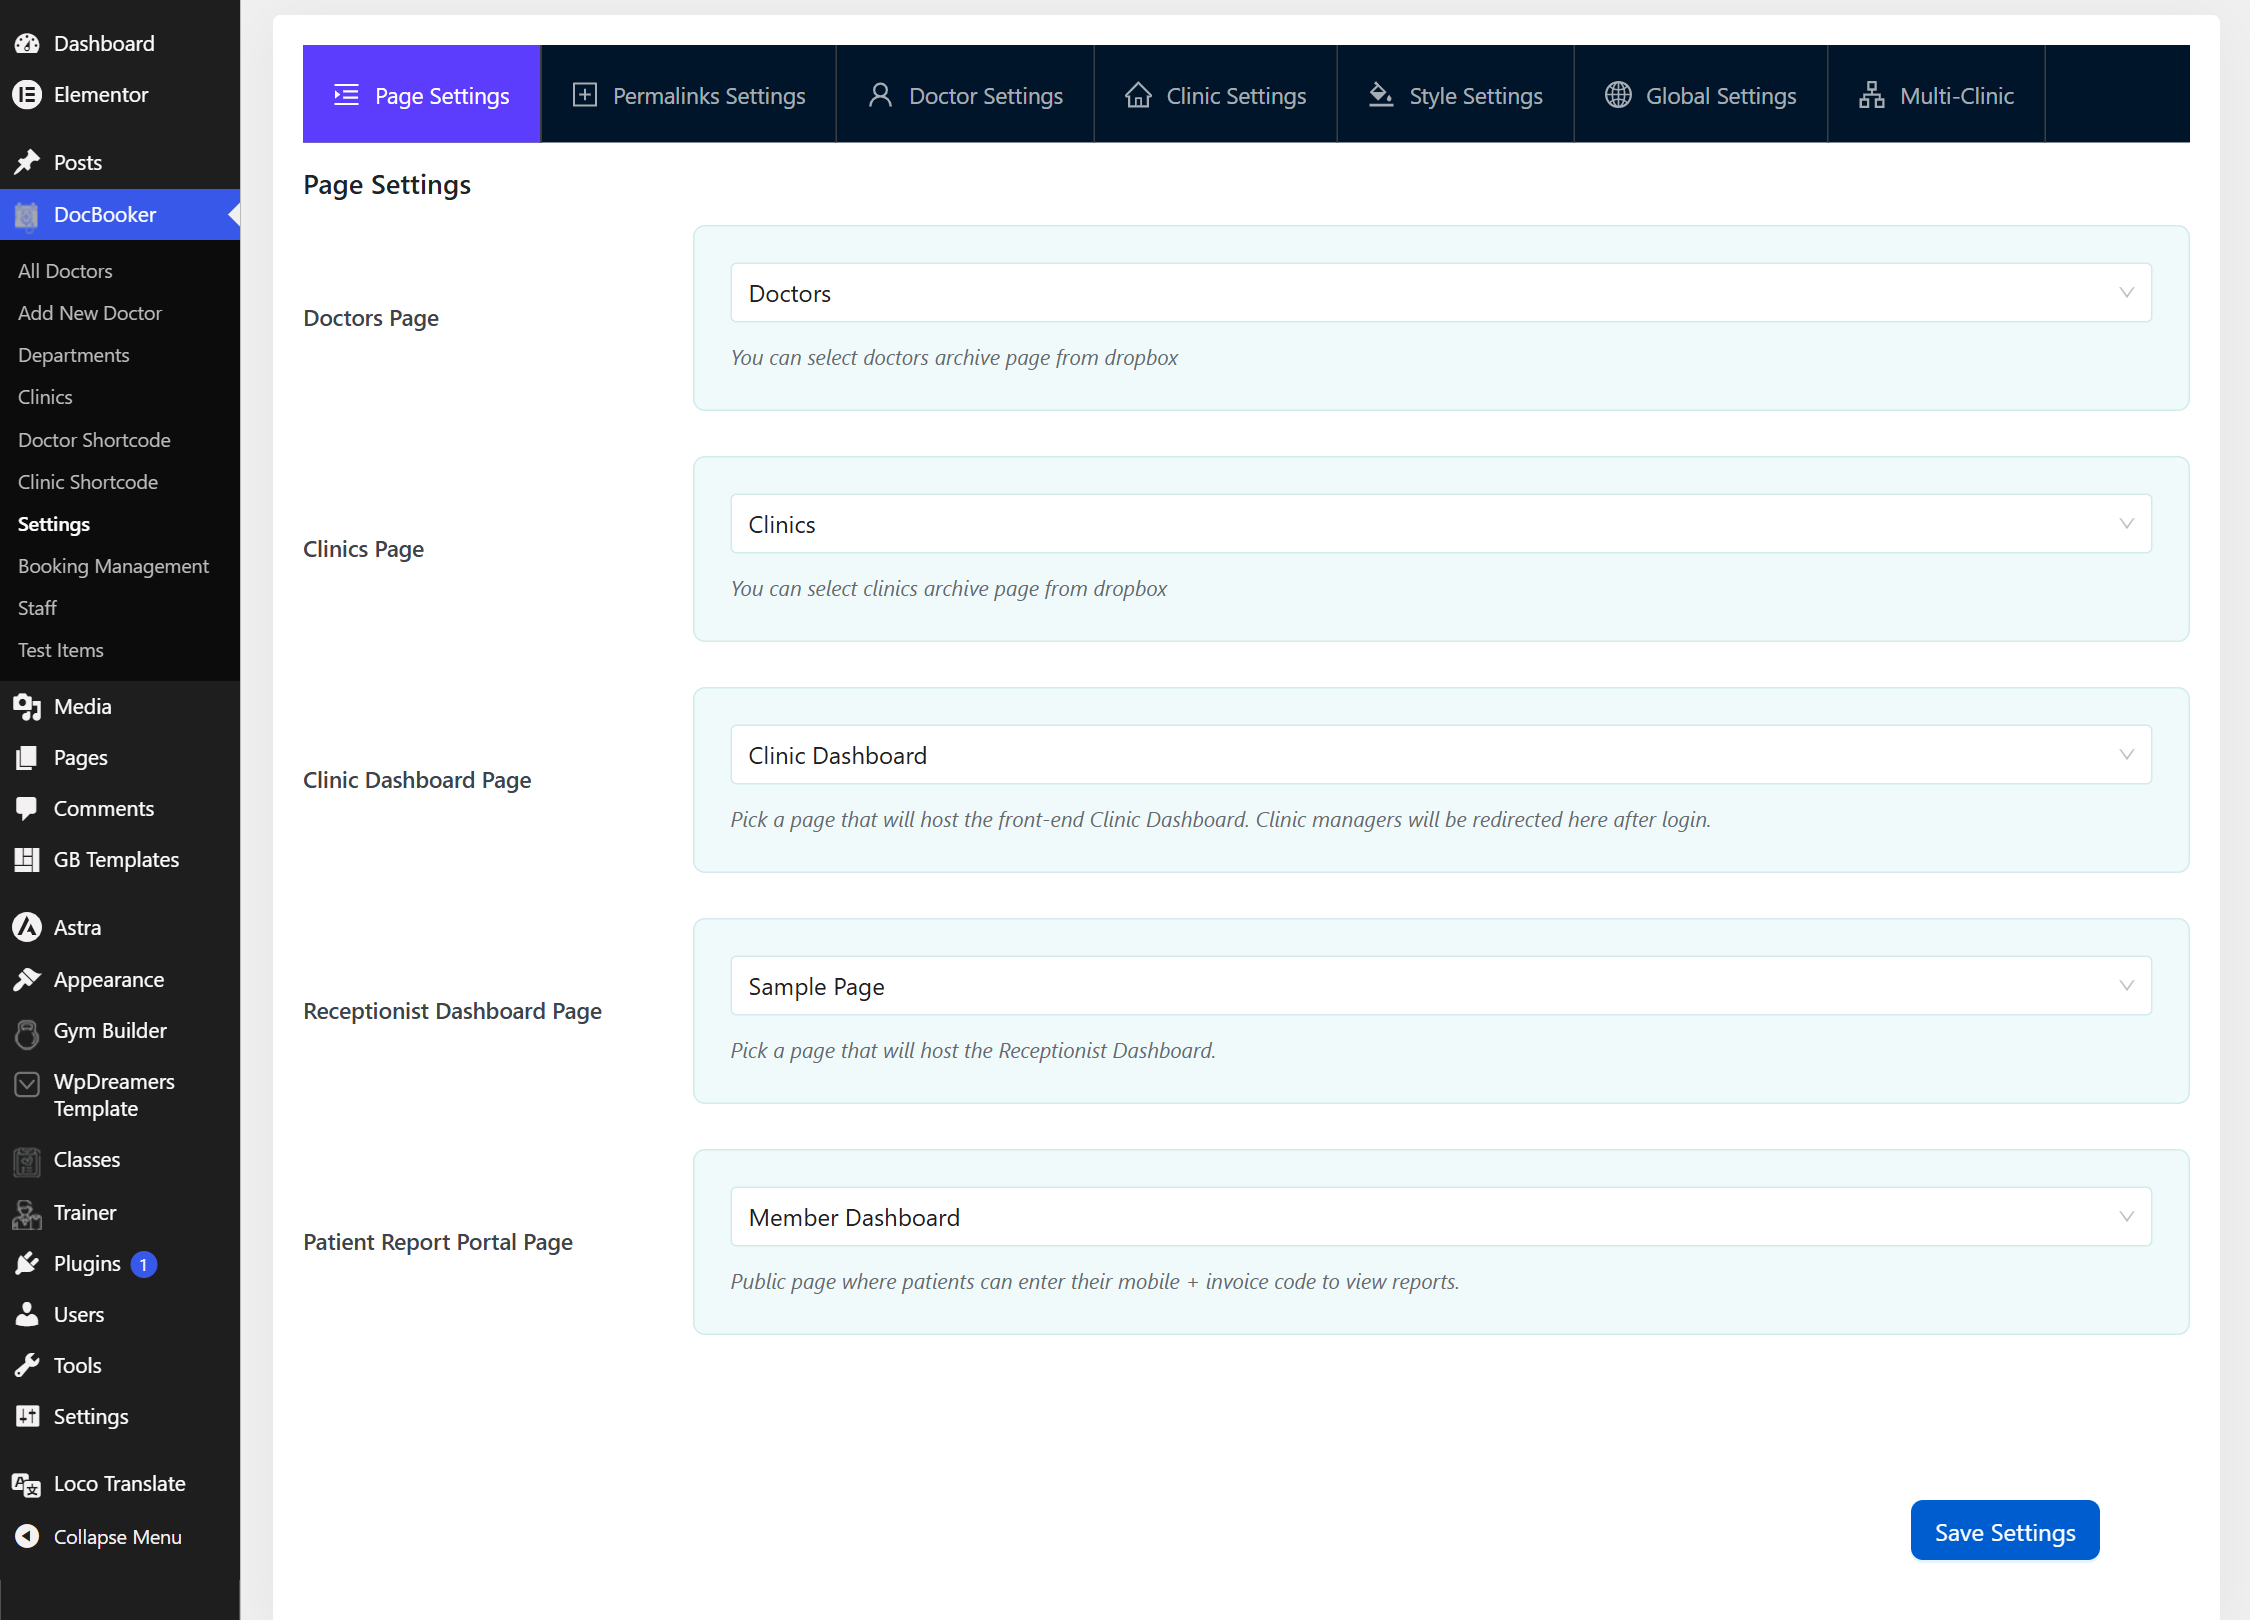
Open DocBooker → Settings → Page Settings and point each feature at a WordPress page. This is where the doctor/clinic archives and the Pro dashboards will live.
Doctors Page & Clinics Page — pick (or create) the pages that list your doctors and clinics.
Clinic Dashboard PagePro — the front‑end page clinic managers land on after login.
Receptionist Dashboard PagePro — where front‑desk staff manage patients, visits and billing.
Patient Report Portal PagePro — the public page where patients enter their mobile + invoice code to view lab reports.
Click Save Settings.
/wp-admin/ › DocBooker › Settings › Page Settings
Page Settings — map every DocBooker feature to a page in one place.
3
Brand colors & style
Free
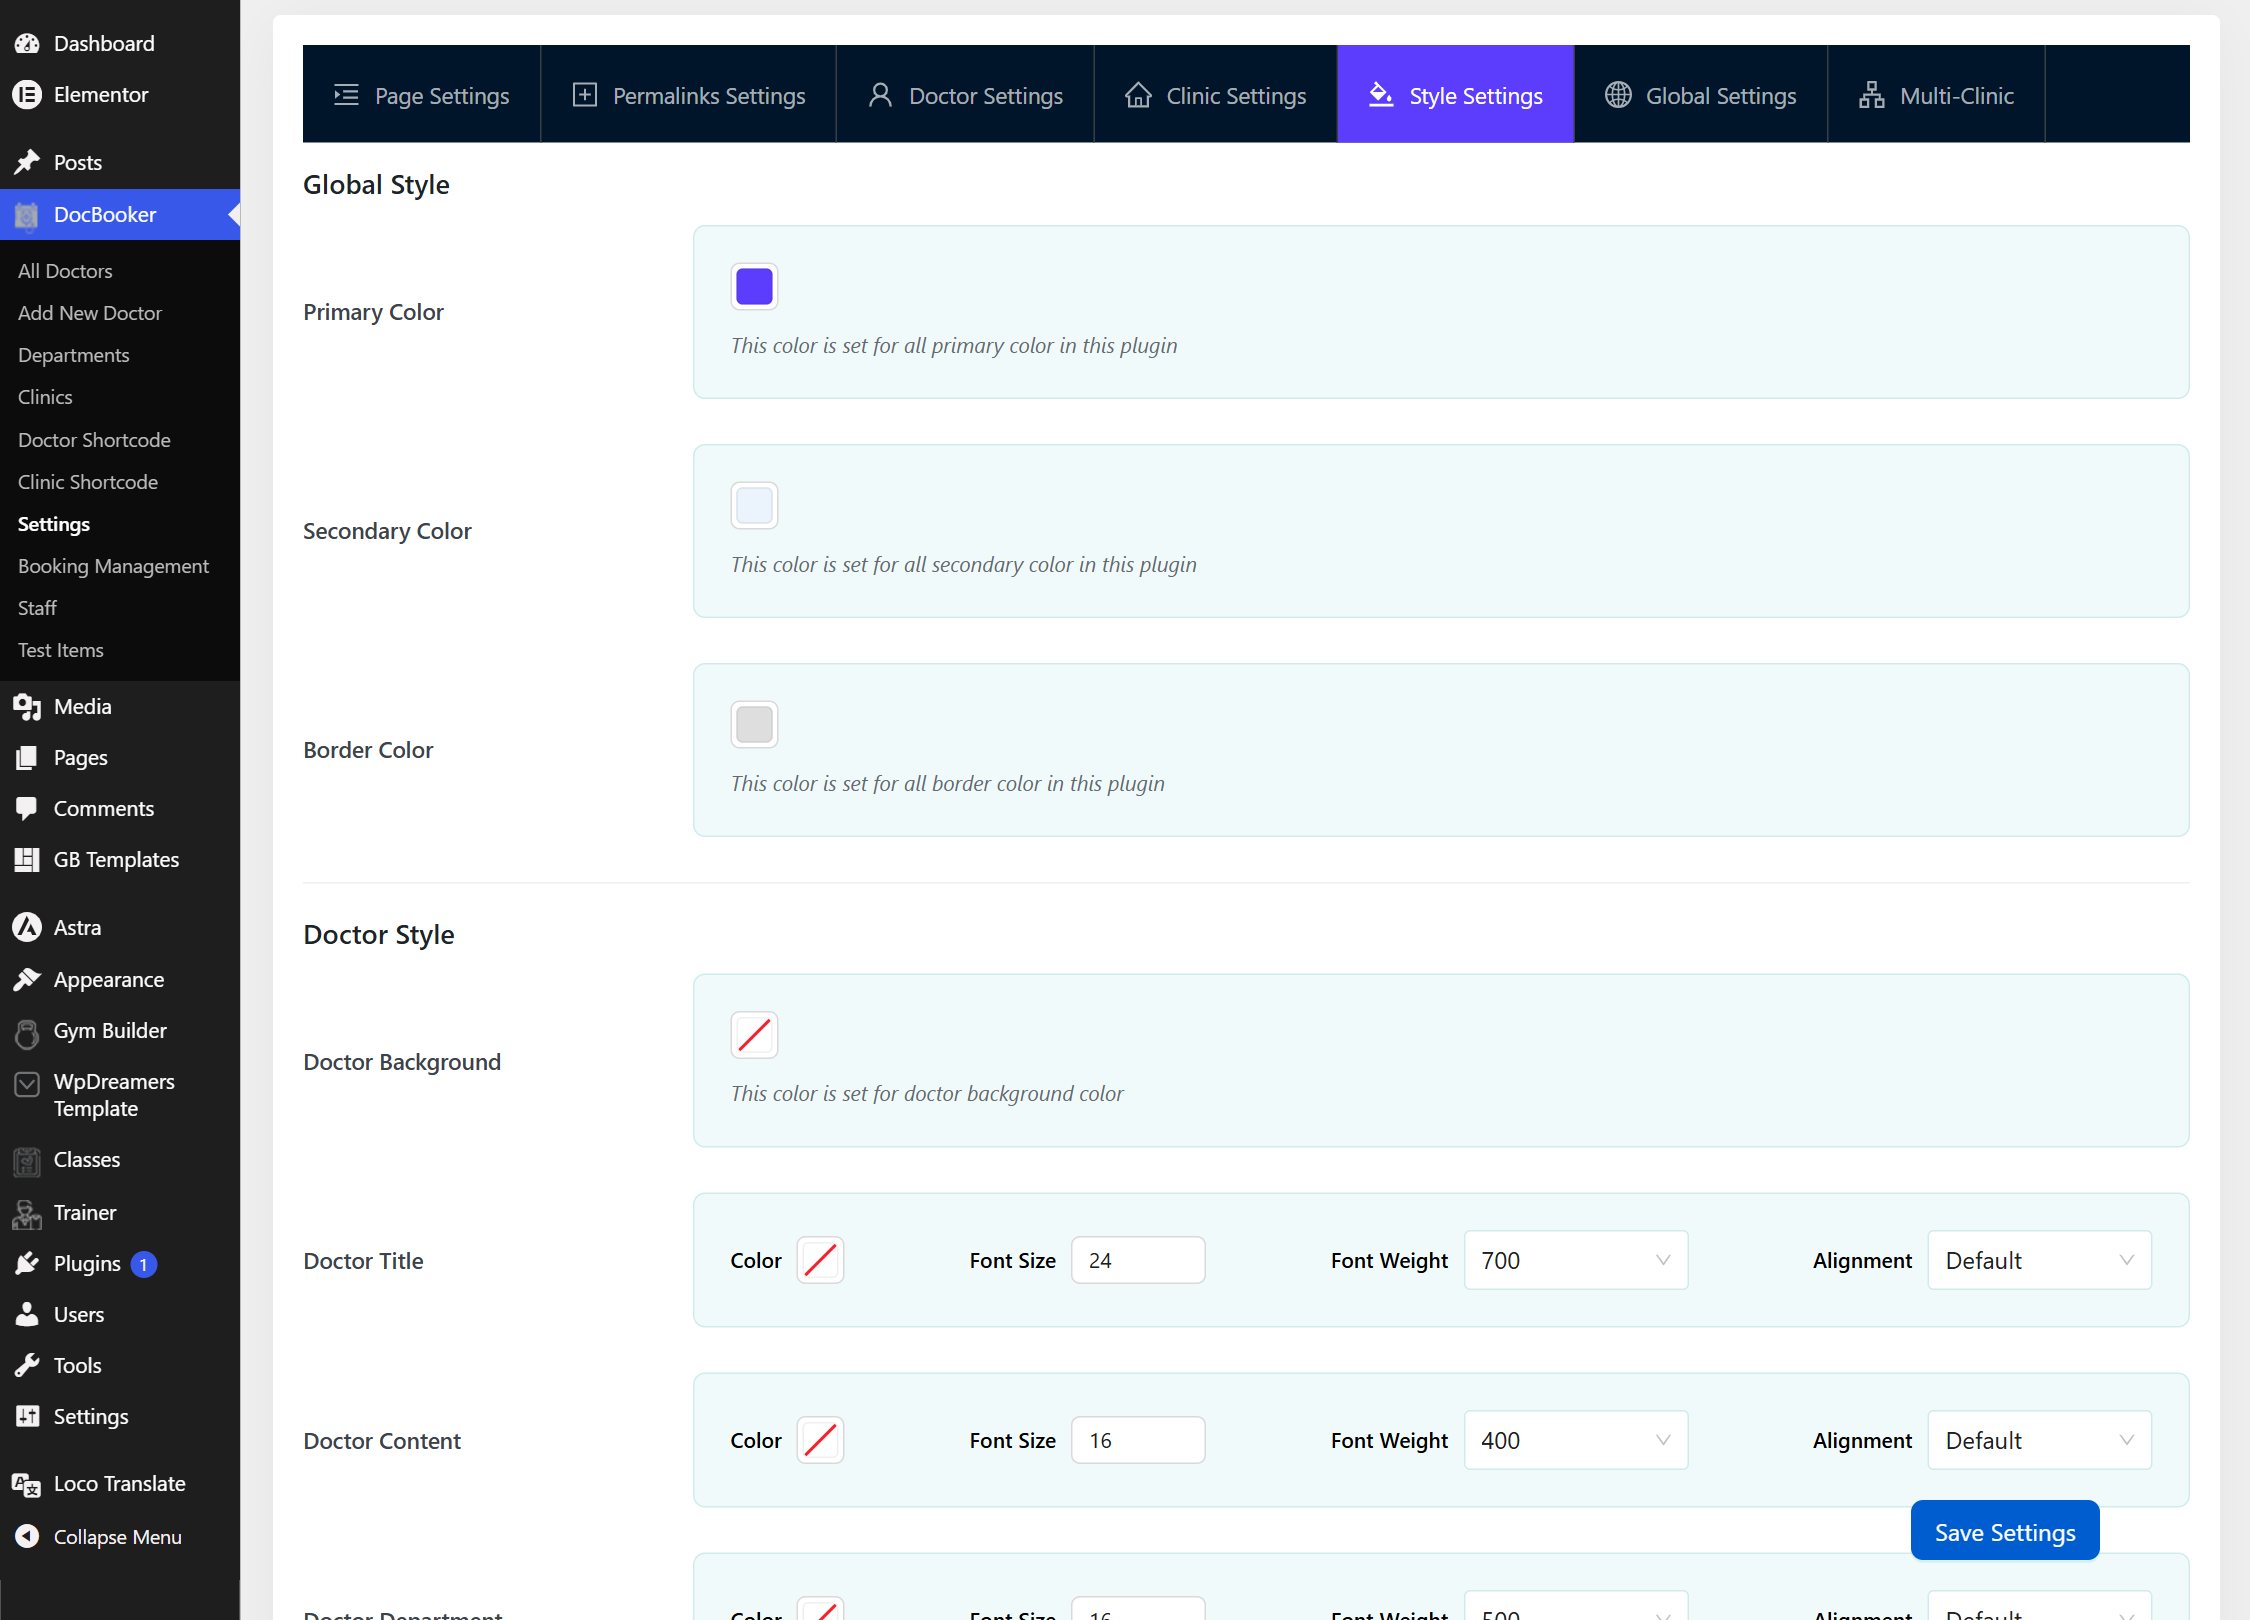
The Style Settings tab controls the colors DocBooker uses on the booking form, archives and dashboards, so everything matches your site.
Go to Settings → Style Settings.
Set your Primary, Secondary, Border and Text colors.
Use the Permalinks Settings tab to customise the URL slugs for doctors, clinics and departments if you like.
Save. The colors apply instantly through CSS variables — no code needed.
Style Settings — pick brand colors that flow through every DocBooker screen.
Free plugin
Doctors, clinics & the booking form
The free plugin gives you a complete online appointment system: doctor profiles, weekly schedules, clinics, a calendar‑based booking wizard, archives and booking management.
1
Add your doctors
Free
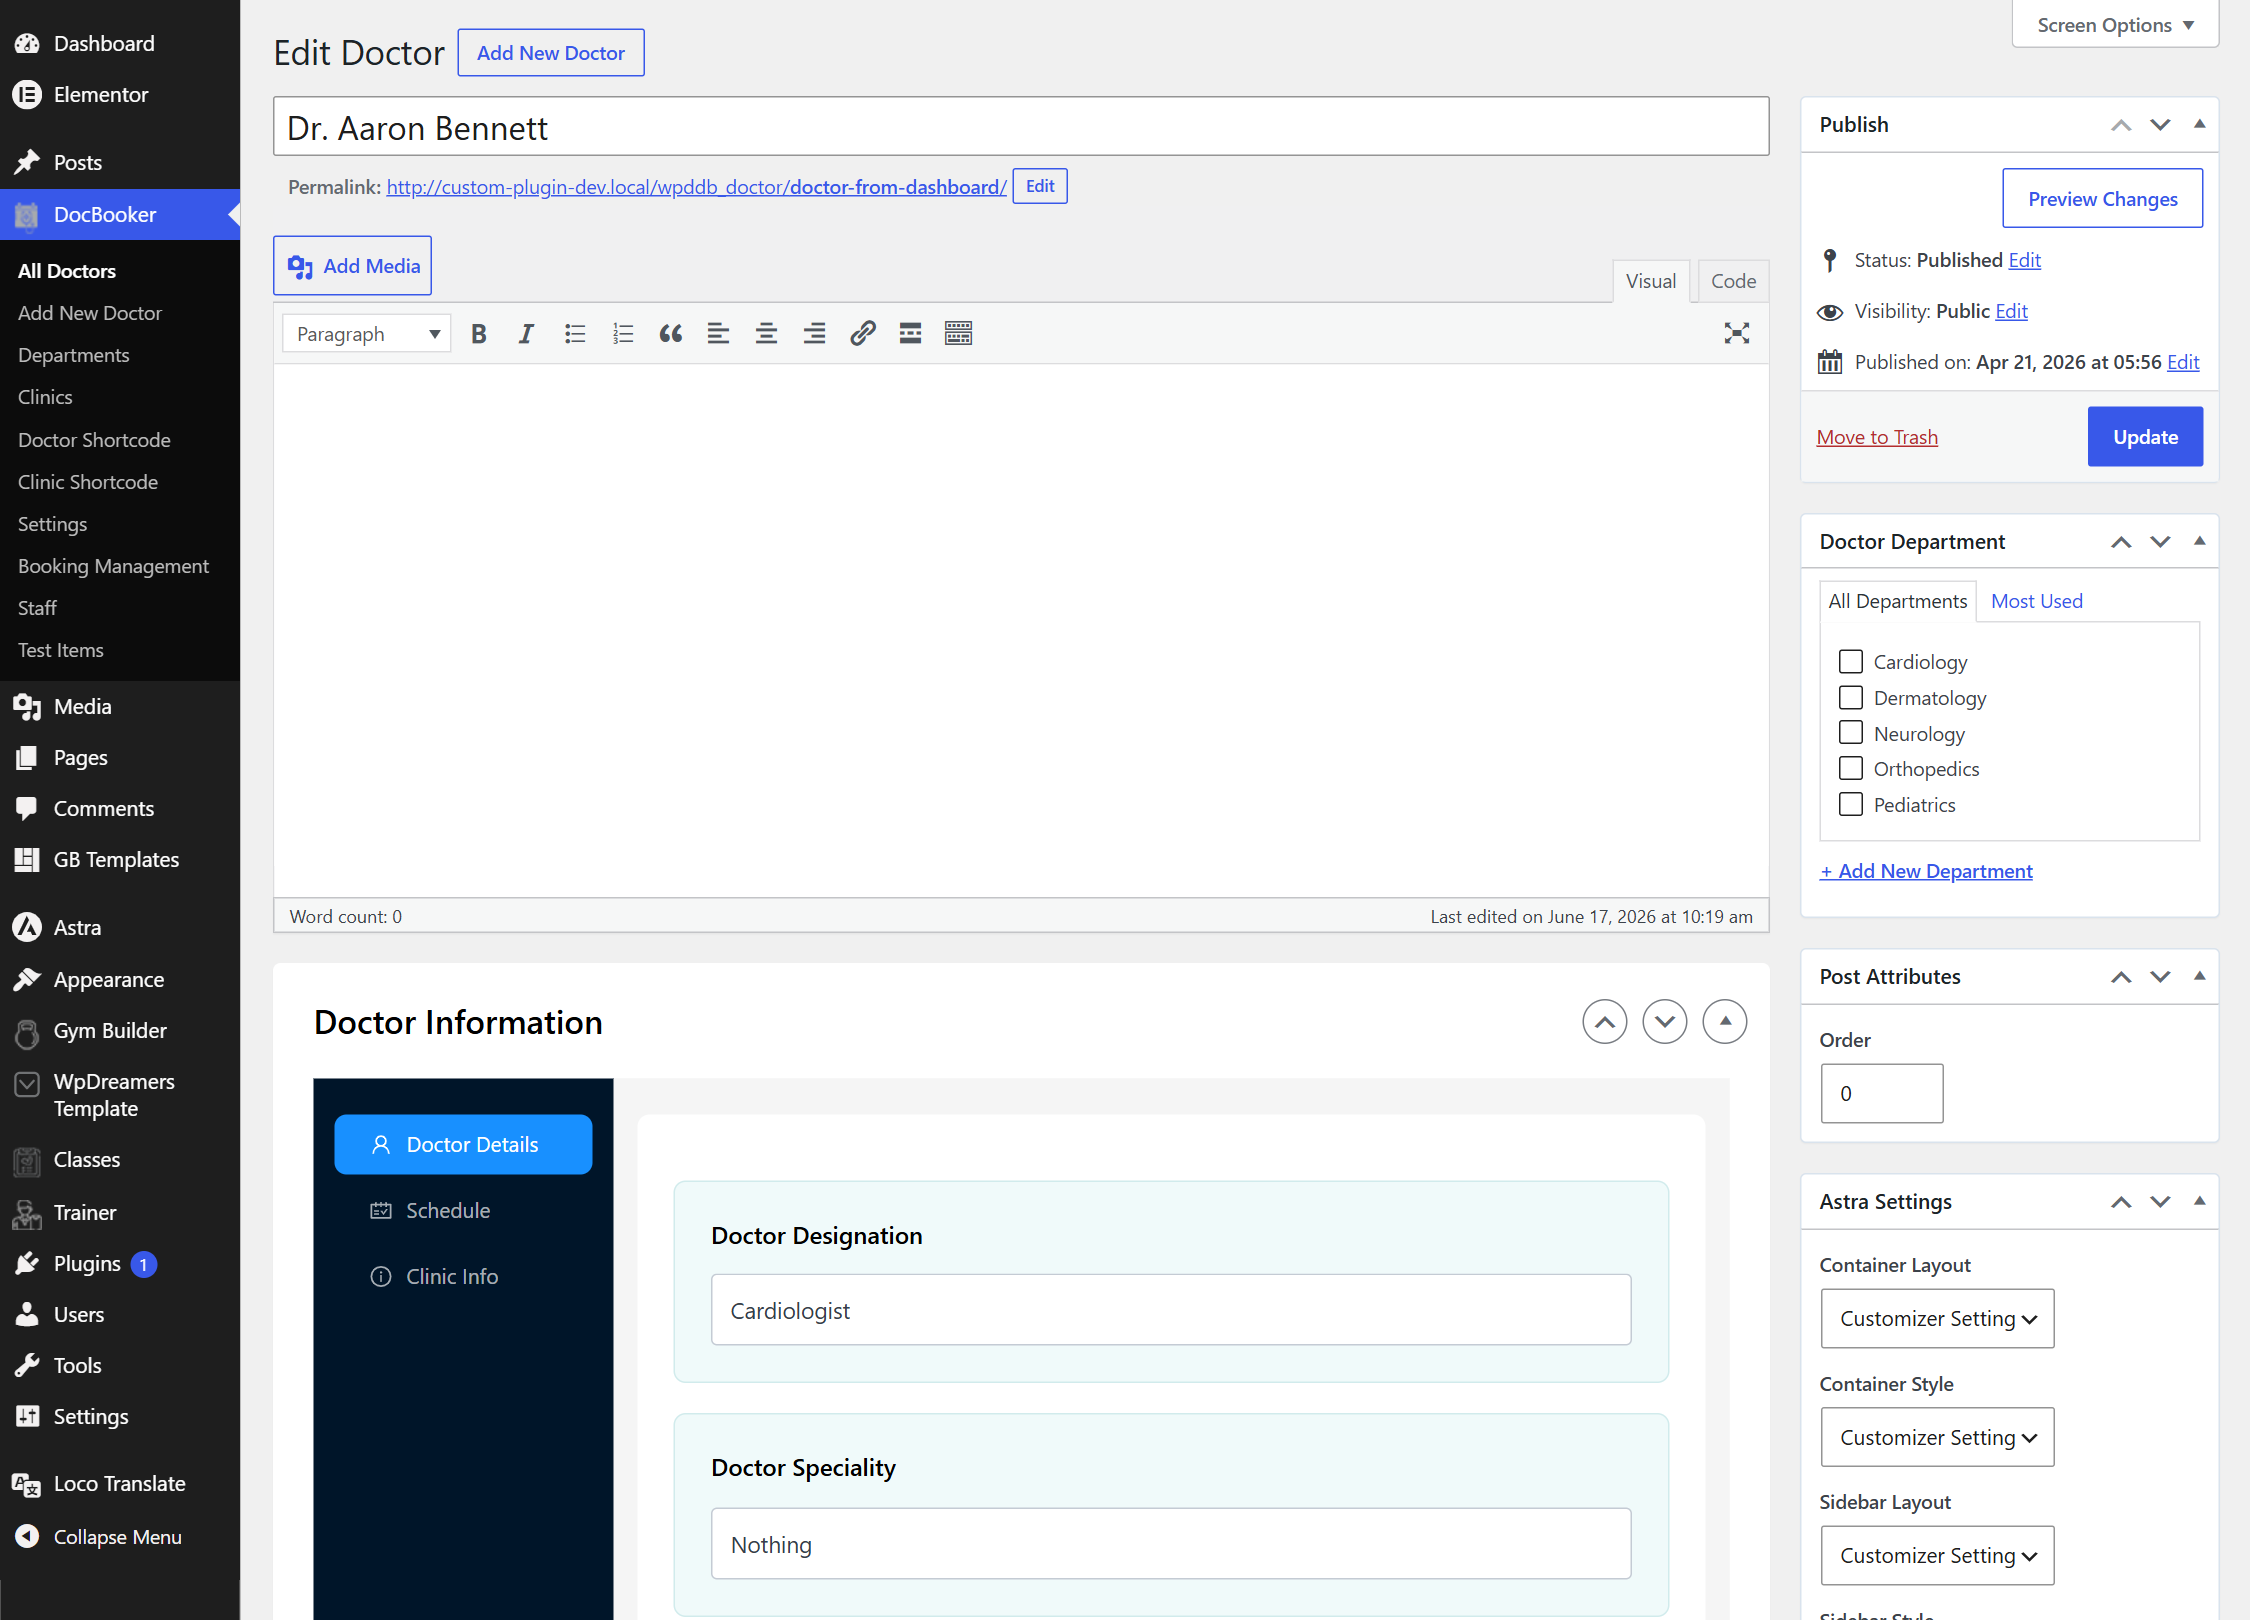
Doctors are the heart of DocBooker. Each doctor gets a profile with a photo, specialty, designation, department and a bookable schedule.
Go to DocBooker → Add New Doctor.
Type the doctor’s name as the title and set a Featured Image for their photo.
In the Doctor Information → Doctor Details tab, fill in Designation (e.g. Cardiologist), Speciality, degree, bio and a “call to book” hotline.
On the right, tick a Doctor Department (add new departments inline if needed).
Click Publish. Repeat for every doctor — there’s no limit.
/wp-admin/ › DocBooker › All Doctors
Your doctor list — add, edit and organise every practitioner.
/wp-admin/ › Edit Doctor
The Doctor Details tab plus the Department selector on the right.
2
Set a weekly schedule
Free
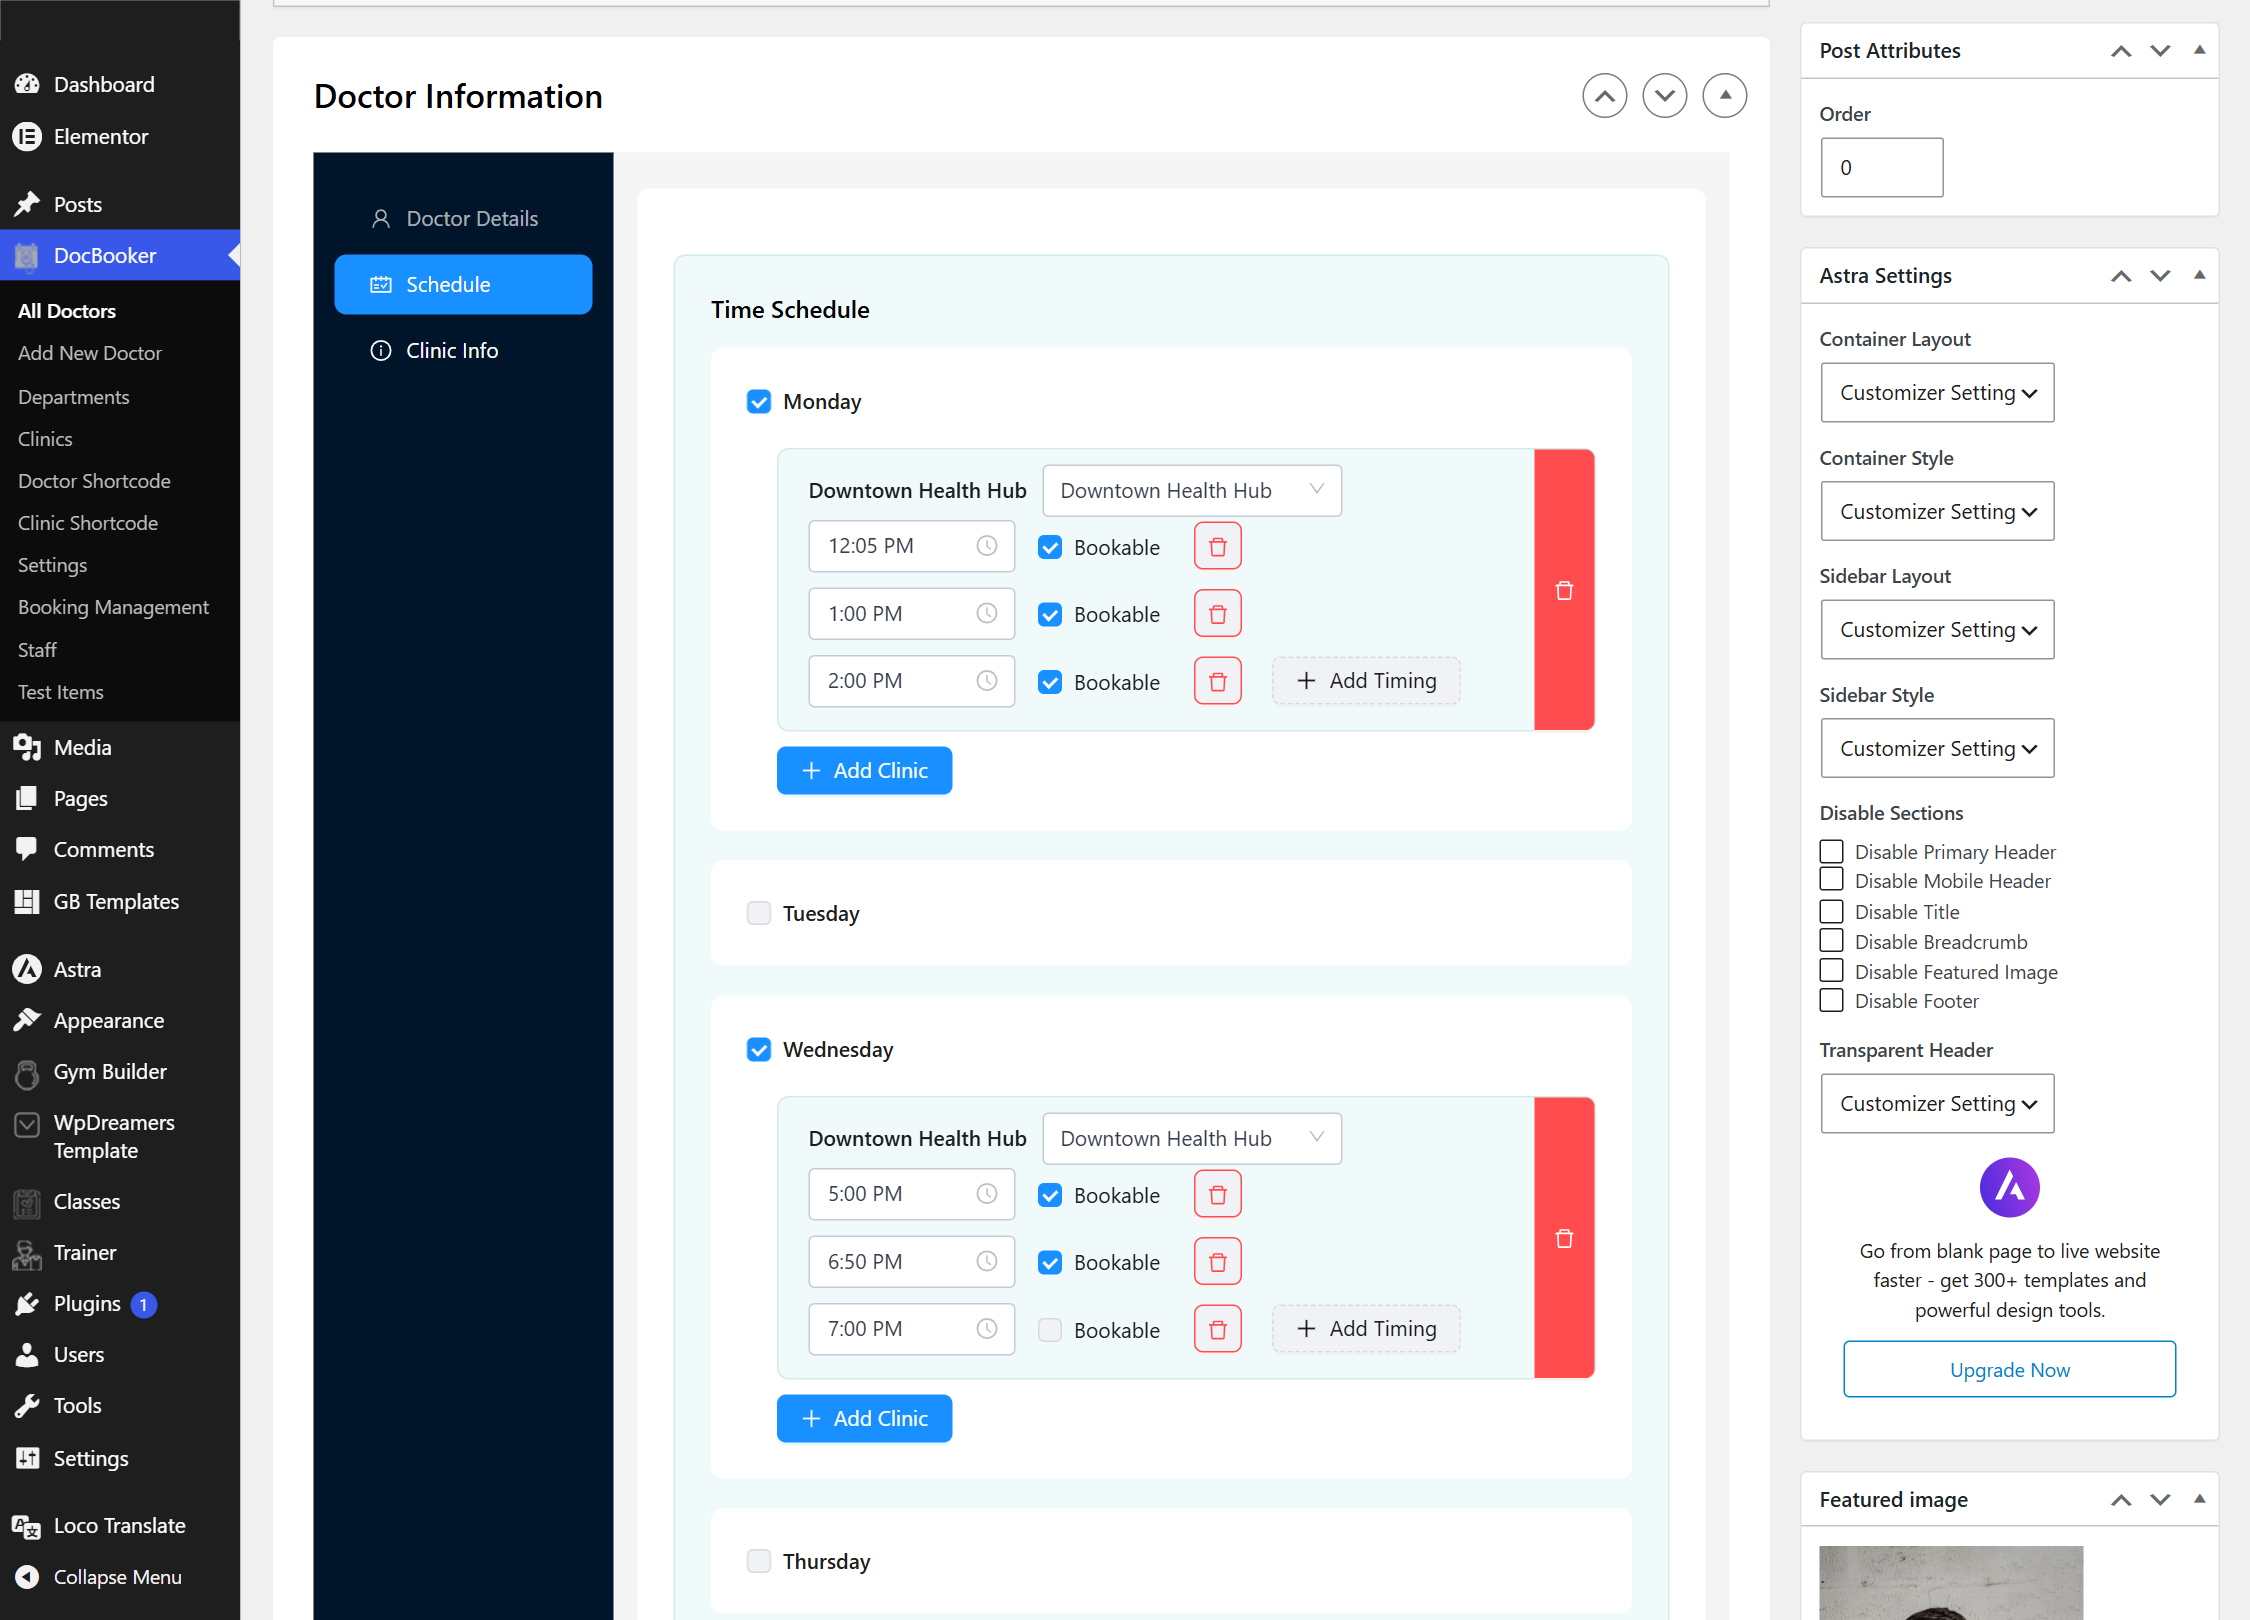
The schedule decides which days, clinics and time slots patients can book. It’s built right into the doctor editor.
While editing a doctor, open the Schedule tab inside Doctor Information.
Tick each day the doctor works (Monday, Wednesday…).
For each day, click Add Clinic and choose the clinic, then Add Timing to add slots like 12:05 PM, 1:00 PM, 2:00 PM.
Leave Bookable ticked for slots patients may book; untick it to show a slot as “not bookable”.
Click Update to save the doctor.
/wp-admin/ › Edit Doctor › Schedule
Time Schedule — per‑day, per‑clinic slots with a Bookable toggle on each.
Dates are handled automatically. The front‑end calendar highlights the weekdays you enable here, and real availability per date is checked against existing bookings — so double‑bookings can’t happen.
3
Block holidays & time off
Free
Going on leave or closing a clinic for a few days? Add a holiday range and those dates are removed from the calendar automatically.
In the doctor editor, open the Clinic Info tab inside Doctor Information.
For the relevant clinic, turn on Holiday / Unavailable.
Pick a start date and end date for the closure.
Update the doctor. Those dates are now blocked on the booking calendar and rejected by the server.
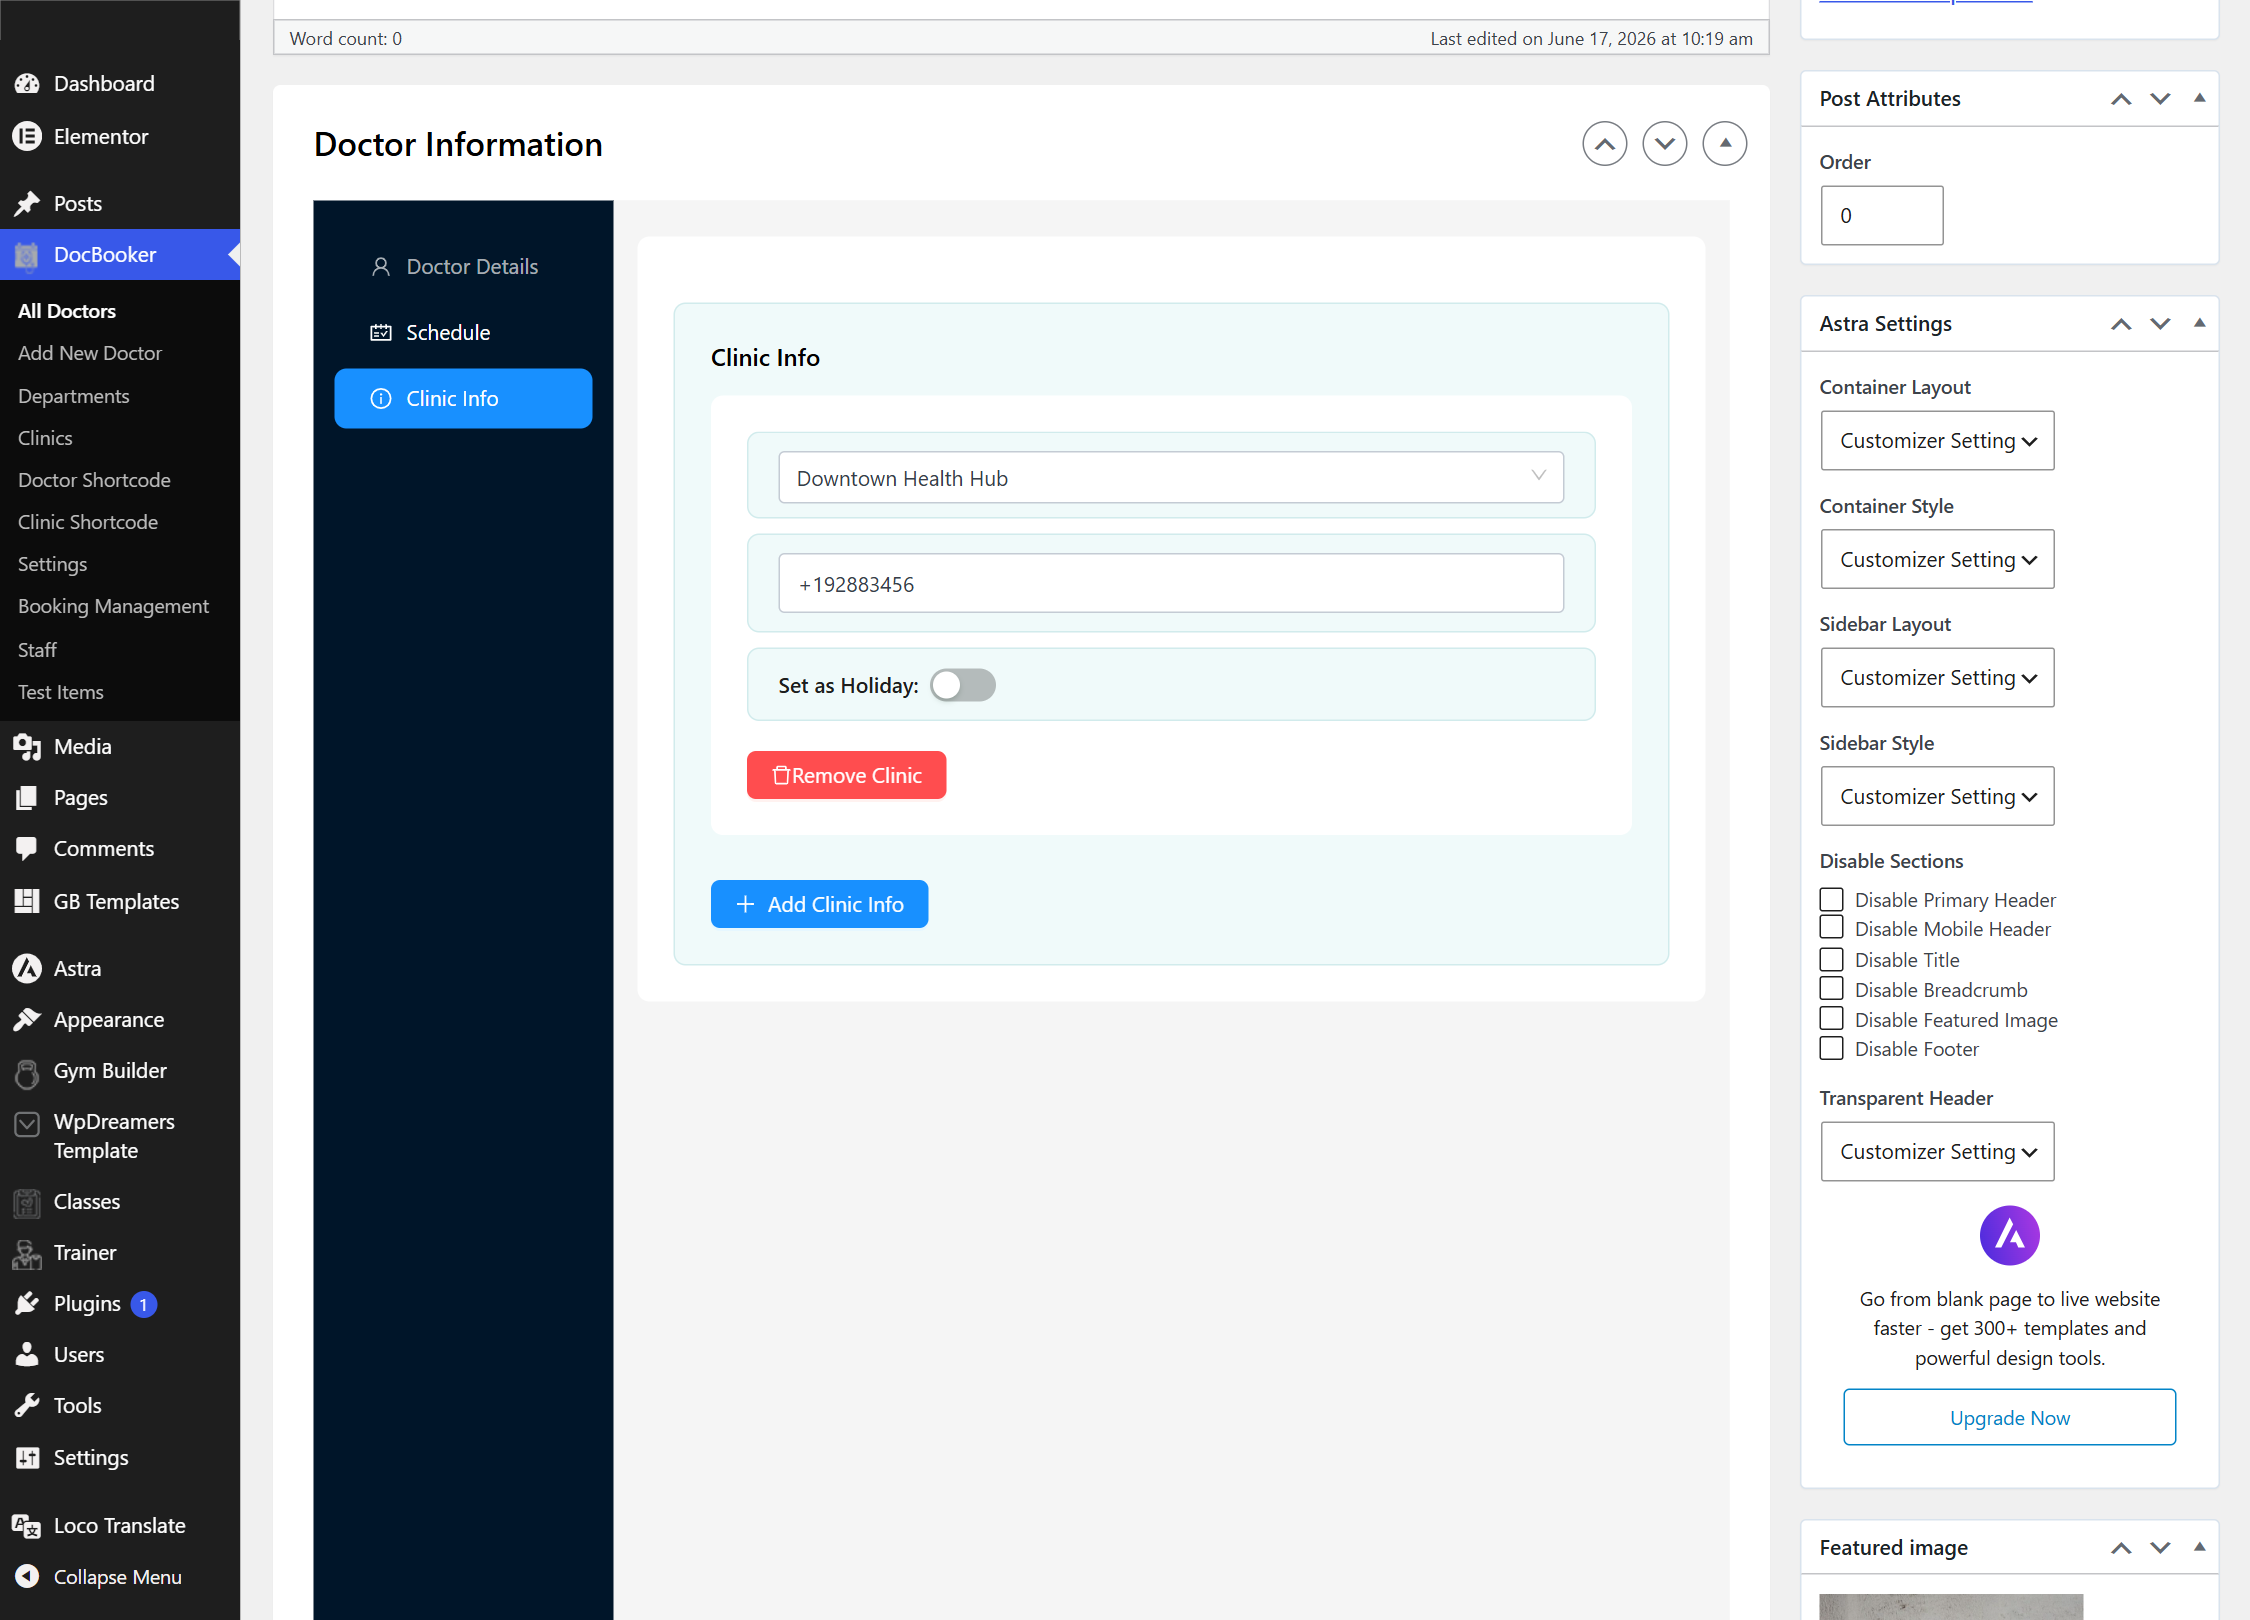
/wp-admin/ › Edit Doctor › Clinic Info
Clinic Info — set the per‑clinic hotline and holiday date range.
4
Add your clinics
Free
Clinics are the locations doctors work from. Each clinic has contact details and a map so patients know where to go.
Go to DocBooker → Clinics → Add New.
Enter the clinic name, and add its hotline number and email.
Drop a pin on the built‑in Leaflet map to show the location (no Google Maps key needed).
Set a Featured Image for the clinic and Publish.
Back in a doctor’s Schedule, you can now assign slots to this clinic.
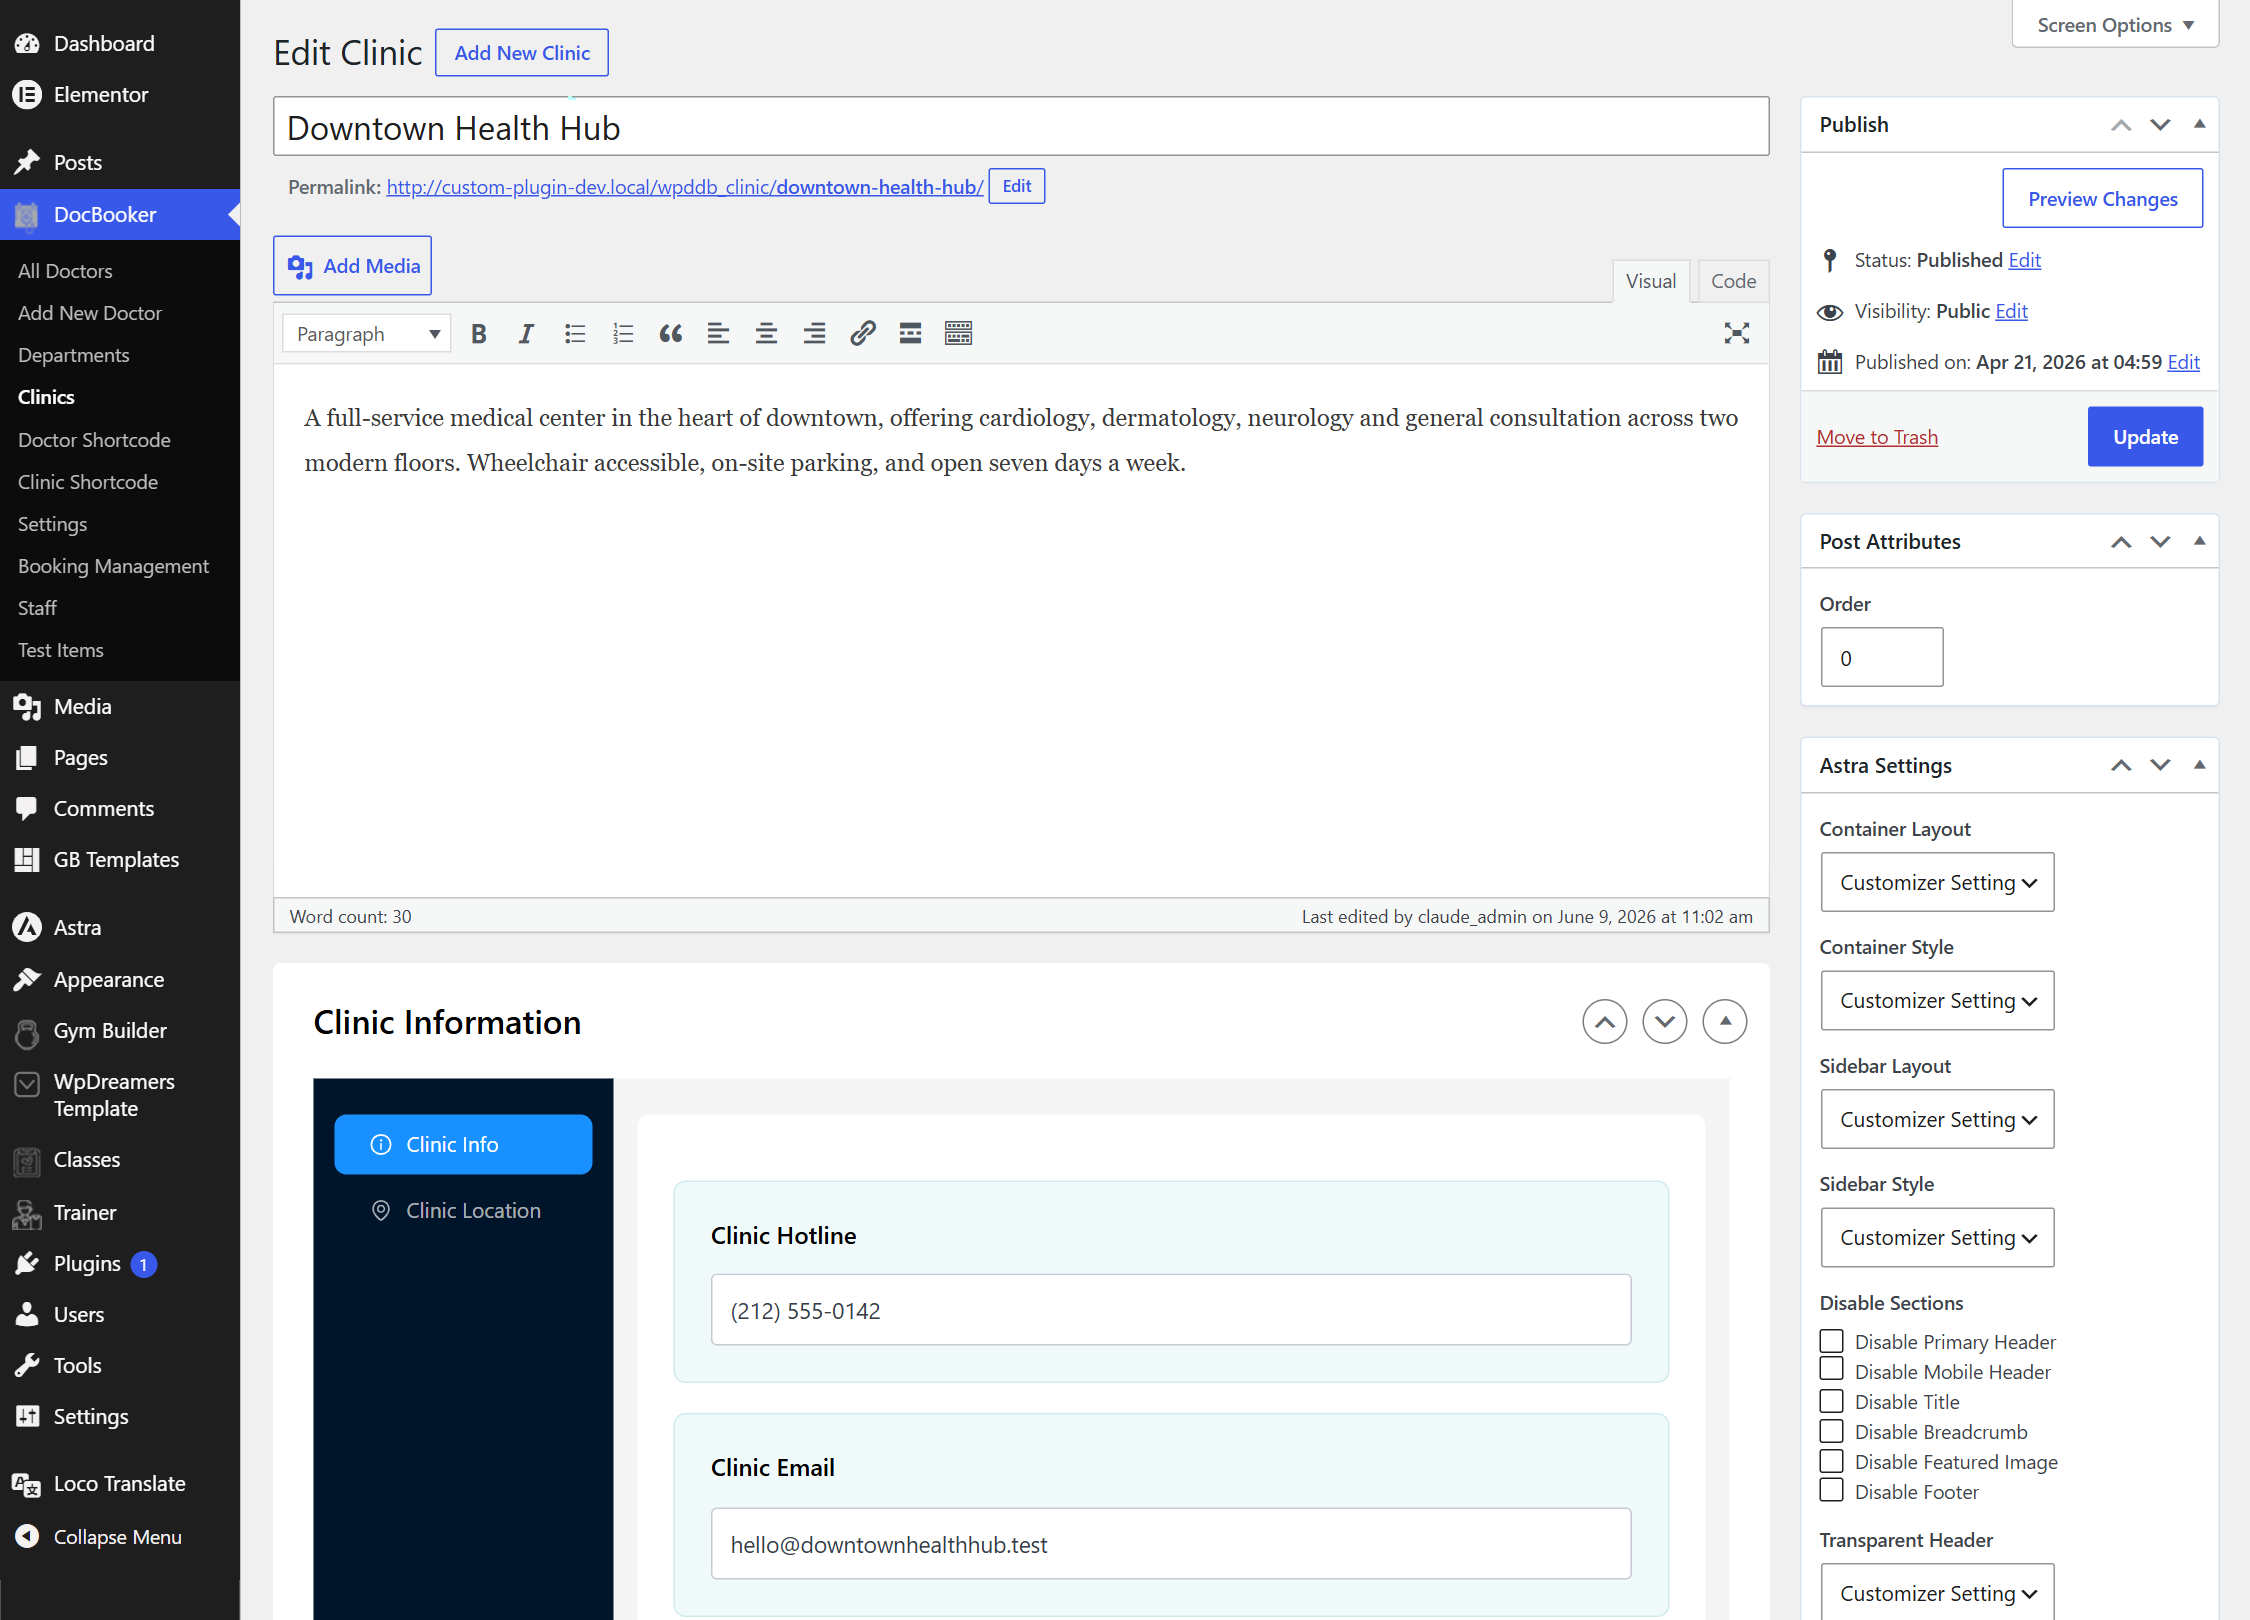
/wp-admin/ › Edit Clinic
Clinic editor — contact info and a Leaflet map pin.
5
Organise with departments
Free
Departments (Cardiology, Dermatology, Pediatrics…) group your doctors and power the first step of the booking wizard and the filter widget.
Go to DocBooker → Departments and add each department.
Assign doctors to departments from the Doctor Department box in the doctor editor.
Patients can then browse or filter doctors by department on the front end.
6
Publish the booking form
Free
The star of the show: a multi‑step booking wizard that walks patients through Department → Doctor → Date & Time → Details → Confirmation.
Create (or edit) the page where you want the form, e.g. “Book an Appointment.”
Paste the shortcode
Book Your Appointment
into the content (or a shortcode block).
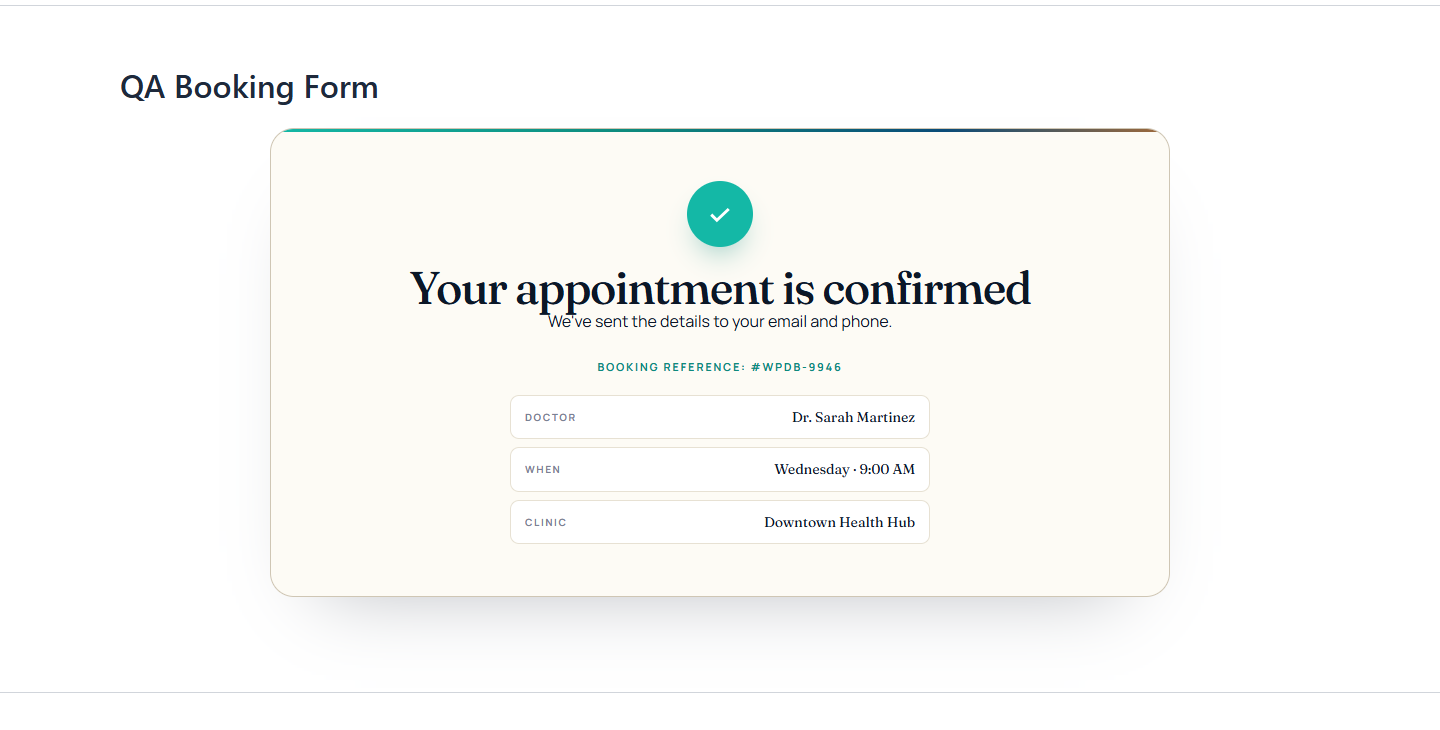
Publish the page. Patients pick a department, choose a doctor, select an available date on the calendar, pick a time slot, and enter their details.
On submit, the booking is saved, the slot is reserved, and confirmation emails go out.
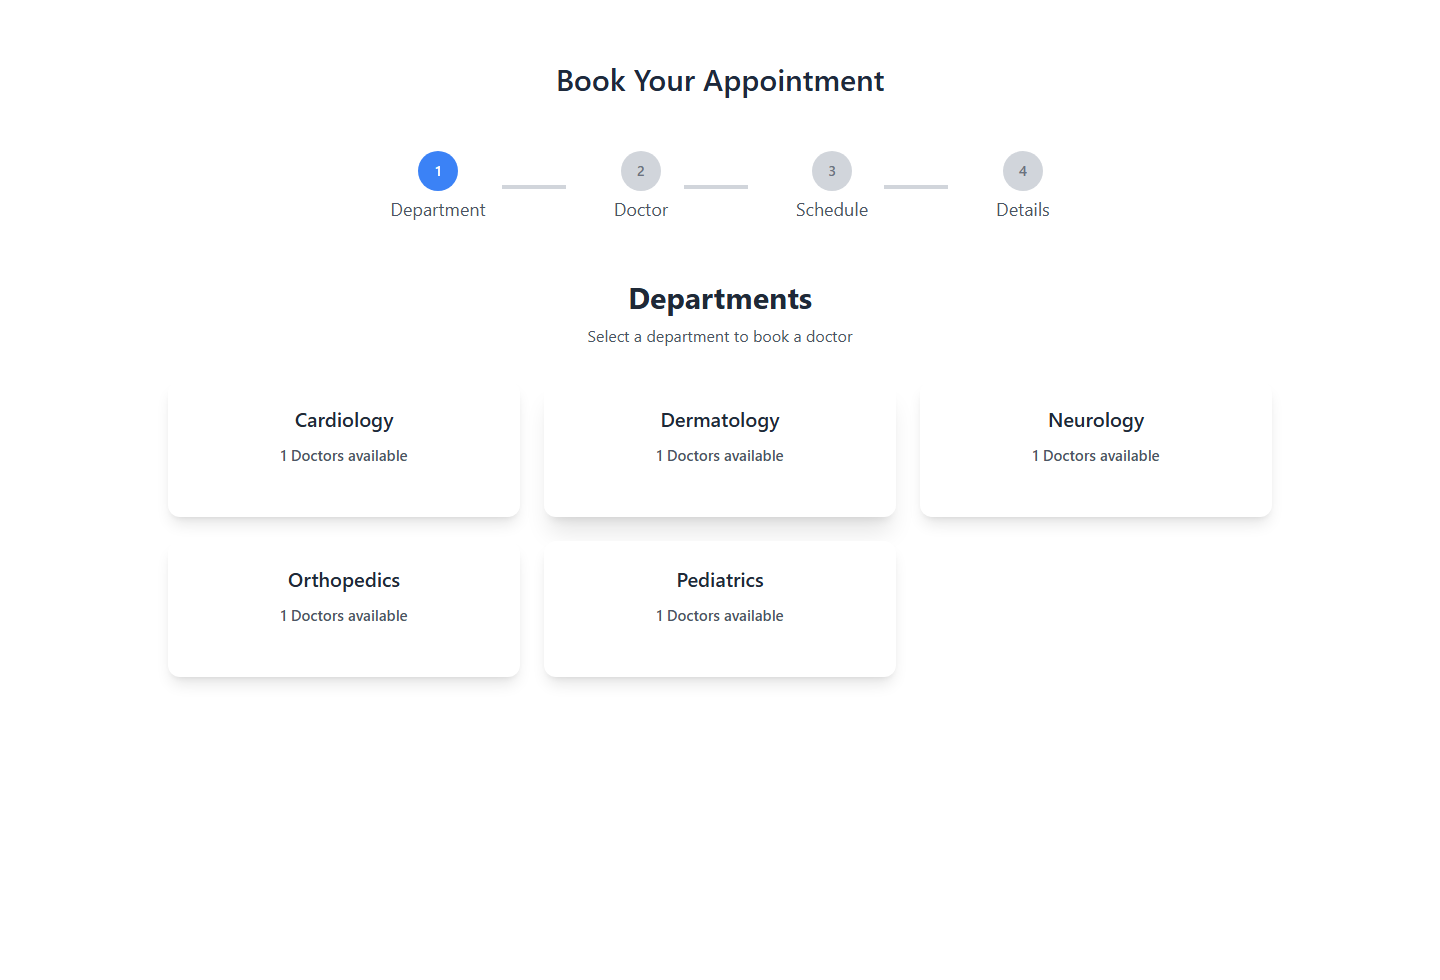
yoursite.com/book-appointment
Step 1 — the patient chooses a department, then a doctor.
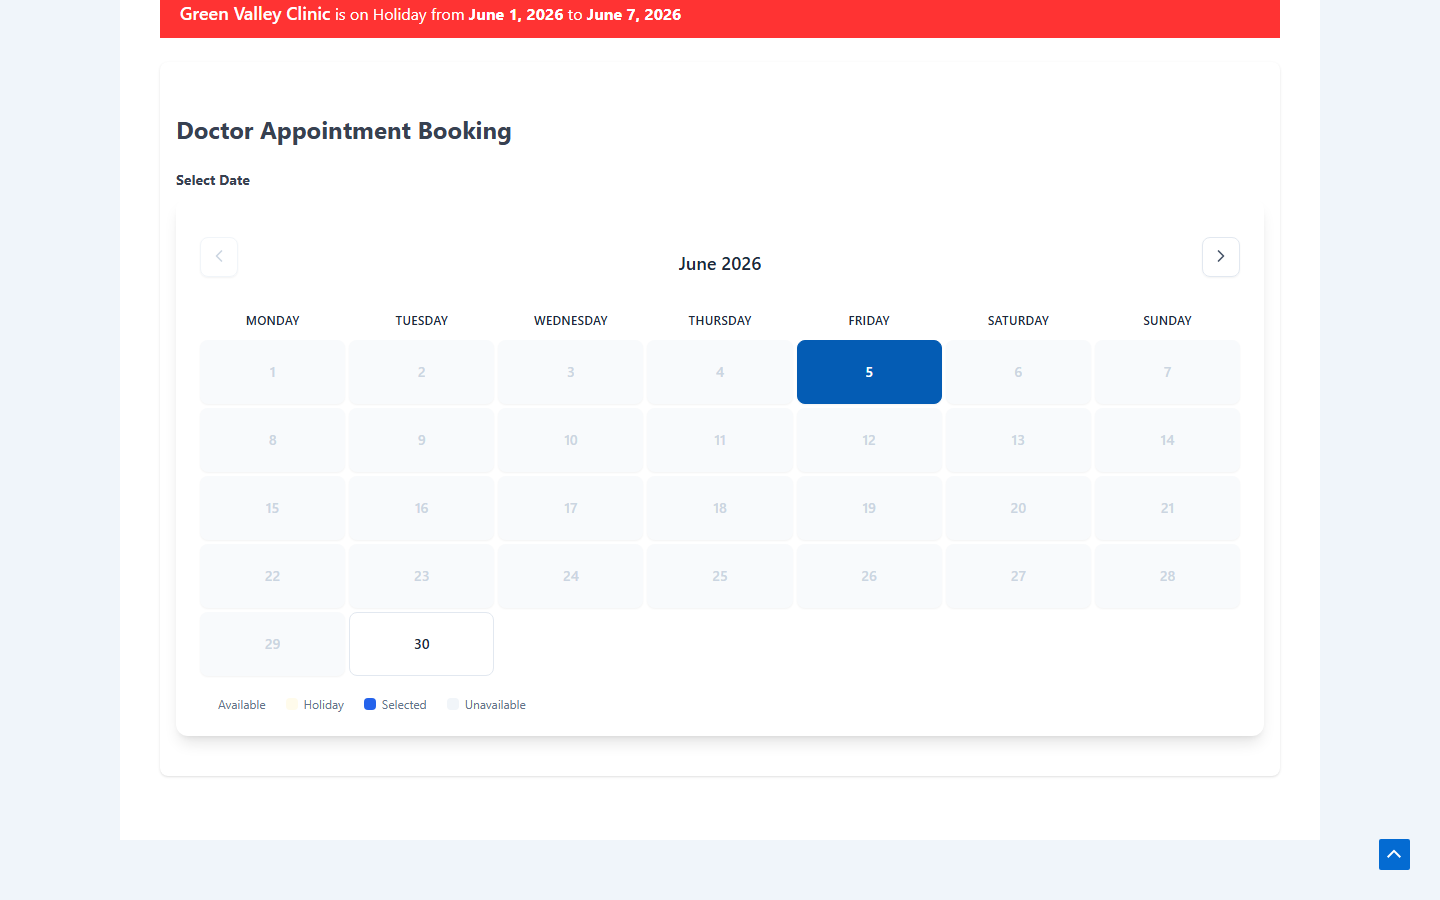
yoursite.com/book-appointment
The calendar shows only real availability; holidays are greyed out.
You can also drop the Booking Form or Quick Book Gutenberg block on any page — see Gutenberg blocks below.
7
Doctor & clinic archives + filter widget
Free
DocBooker automatically builds browsable archive pages for your doctors and clinics, with a filter widget so patients can narrow by department, clinic or name.
Visit your Doctors Page (set in step 2 of Getting Started) to see the doctor archive.
Adjust the layout under Settings → Doctor Settings / Clinic Settings — grid columns, posts per page, ordering and thumbnails.
Add the Doctor Filter widget to a sidebar via Appearance → Widgets to let visitors filter by department, clinic or name.
Clicking a doctor opens their single page with the booking form already attached.
yoursite.com/doctors
The doctor archive with the filter widget and doctor cards.
8
Show doctors & clinics anywhere
Free
The shortcode generator lets you drop a curated list of doctors or clinics onto any page — a landing page, a department page, wherever.
Go to DocBooker → Doctor Shortcode (or Clinic Shortcode) and click Add New.
Configure which doctors/clinics to show and the layout, then publish the shortcode.
Copy the generated shortcode — [ wpddbdoctor id="123" ] or [ wpddbclinic id="123" ].
Paste it into any page or post.
Use [ wpddb_doctor_booking_form ] for the global booking wizard, and [ wpddbdoctor ] / [ wpddbclinic ] for curated listings.
9
Manage bookings
Free
Every appointment lands in one dashboard where you can search, review, cancel or delete it — and cancelling frees the time slot again.
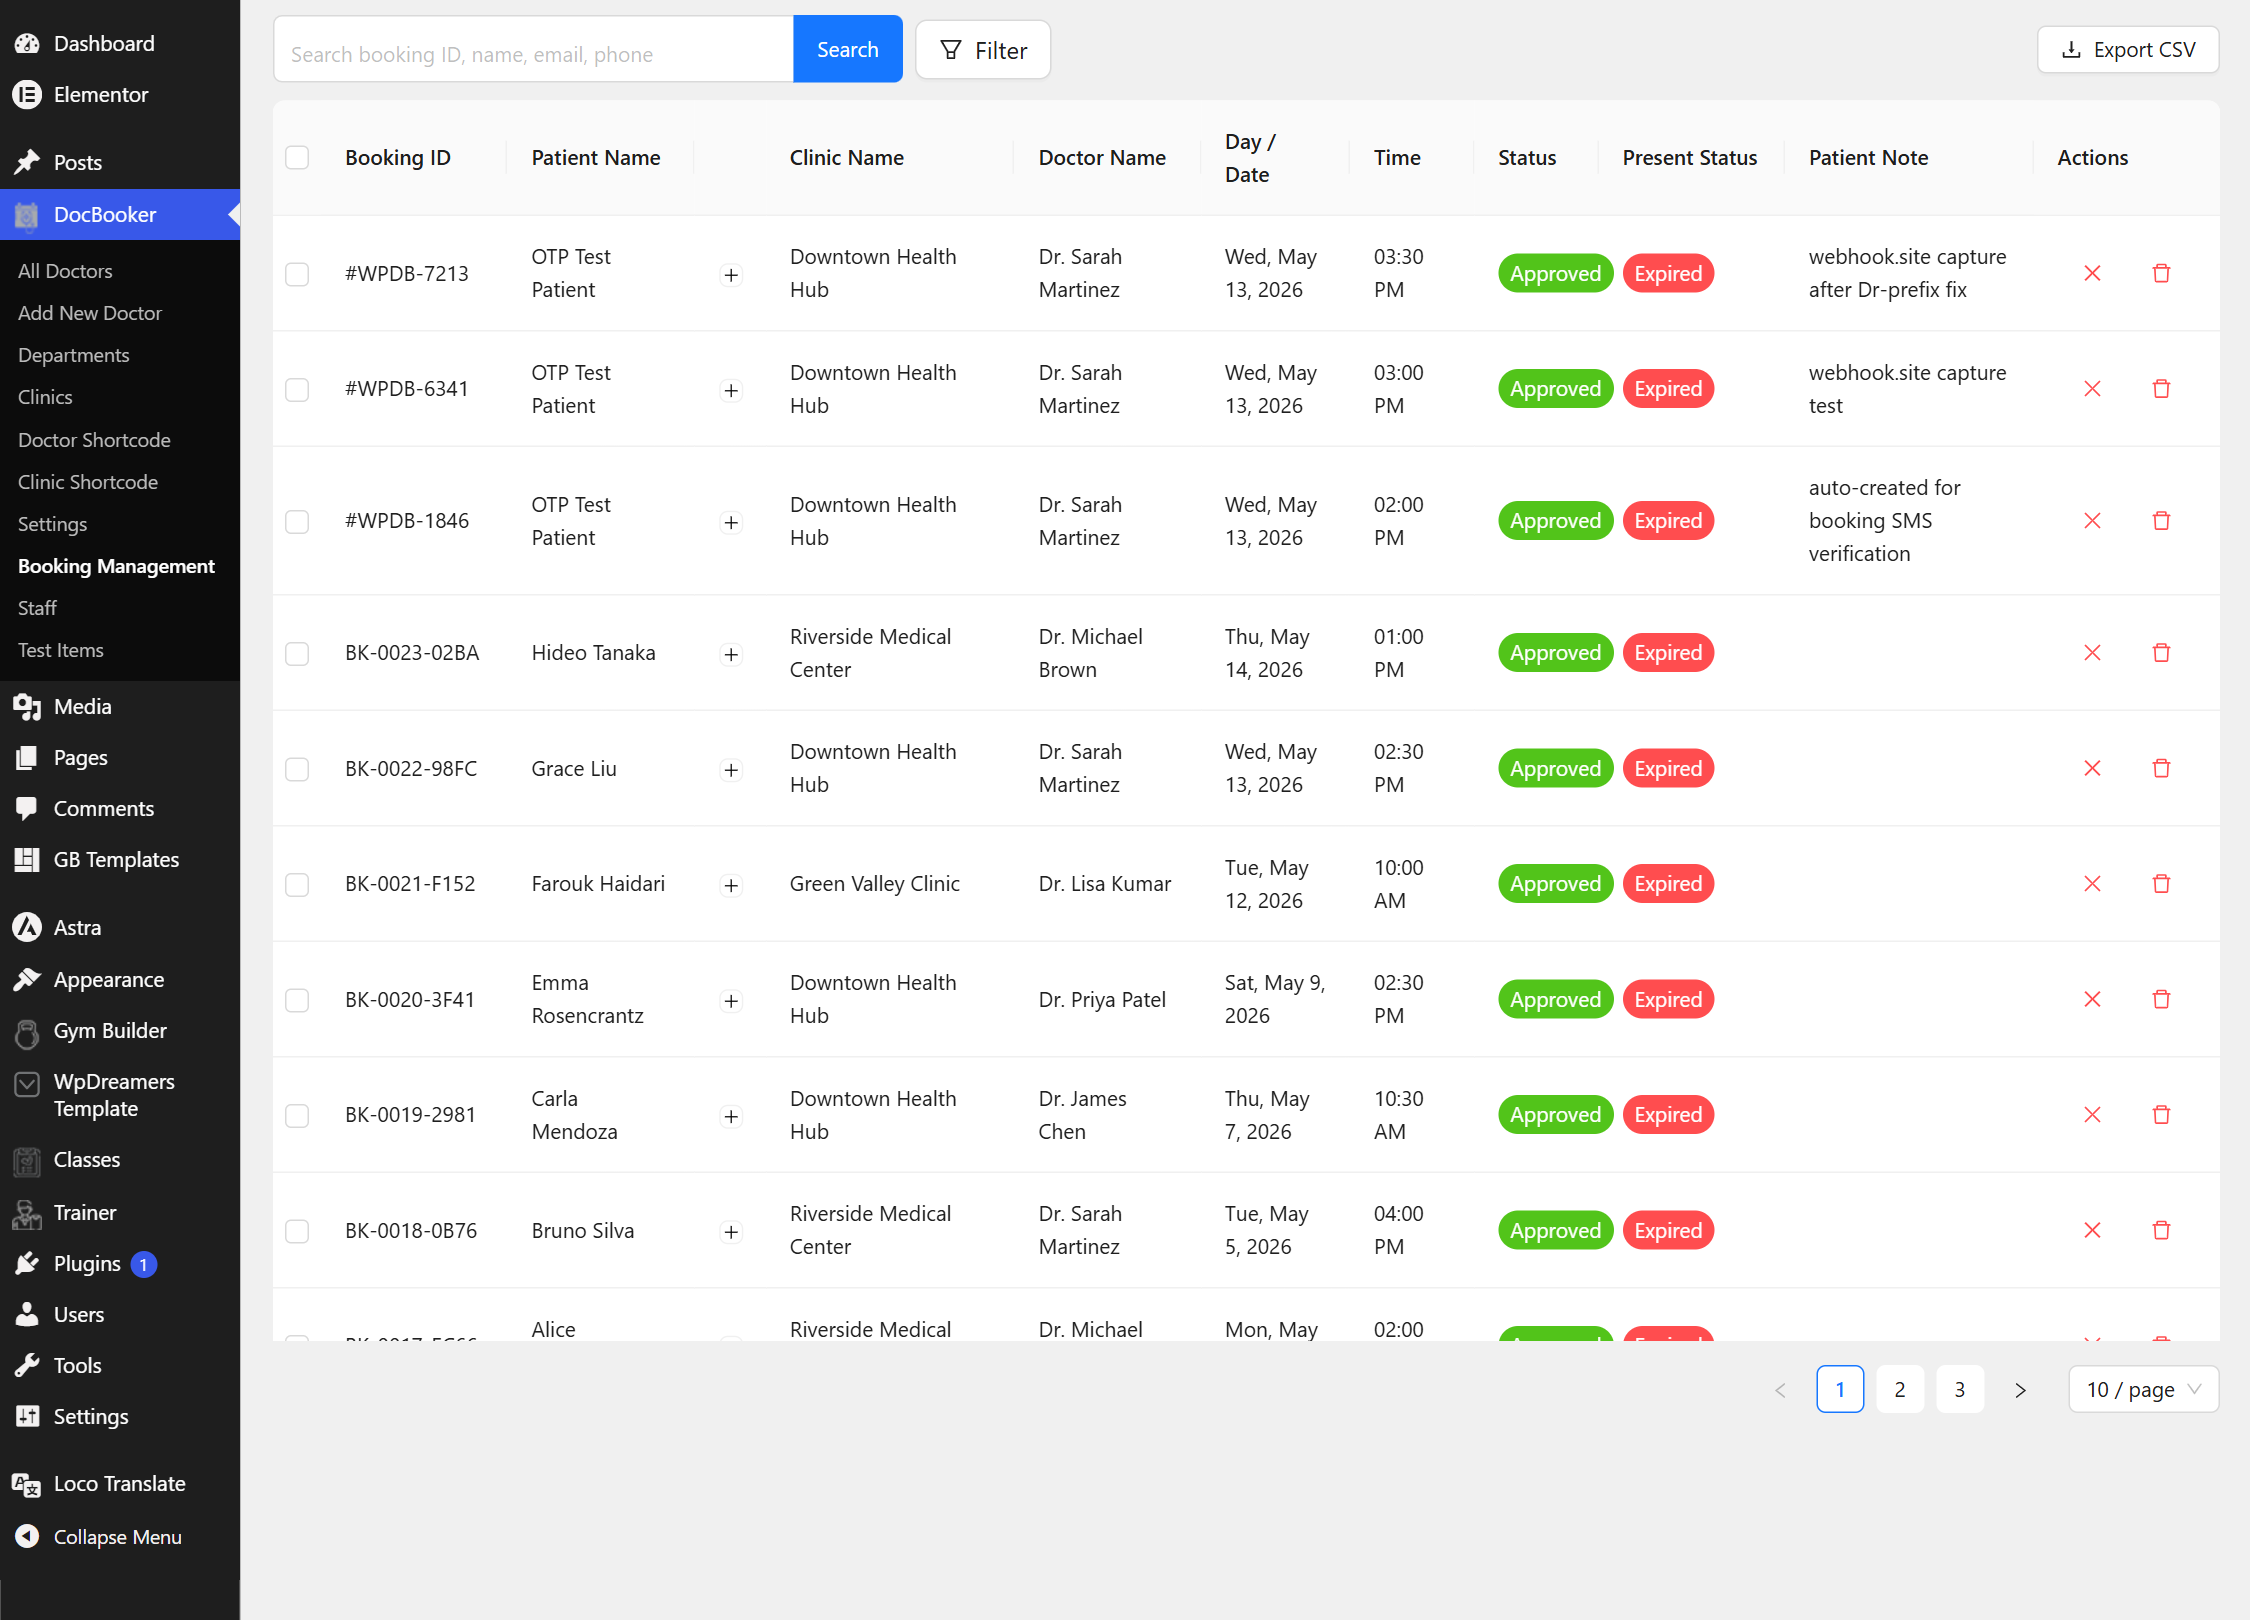
Go to DocBooker → Booking Management.
Search or page through bookings; each shows the patient, doctor, clinic, date, time and status.
Use Cancel to release the slot, or Delete to remove the record.
Want a receptionist to handle this without full admin access? Assign them the built‑in Booking Manager role.
/wp-admin/ › DocBooker › Booking Management
Booking Management — search, cancel and delete appointments.
10
Email notifications
Free
Confirmation emails are sent automatically when an appointment is booked, so patients and staff always have the details.
Patients receive a booking confirmation with the doctor, clinic, date and time.
Booking records store the patient’s name, email and phone for follow‑up.
Emails use your site’s WordPress mail settings — pair with an SMTP plugin for reliable delivery.
Pro plugin
Hospital management with DocBooker Pro
Pro turns DocBooker into a full clinic/hospital system: online payments, multiple clinics with staff roles, a receptionist desk, OPD/IPD visits, itemised billing with printable invoices, a lab‑test catalog and a secure patient portal.
1
Accept online payments
Pro
Collect booking fees at checkout with Stripe or Razorpay, in your own currency, with test and live modes.
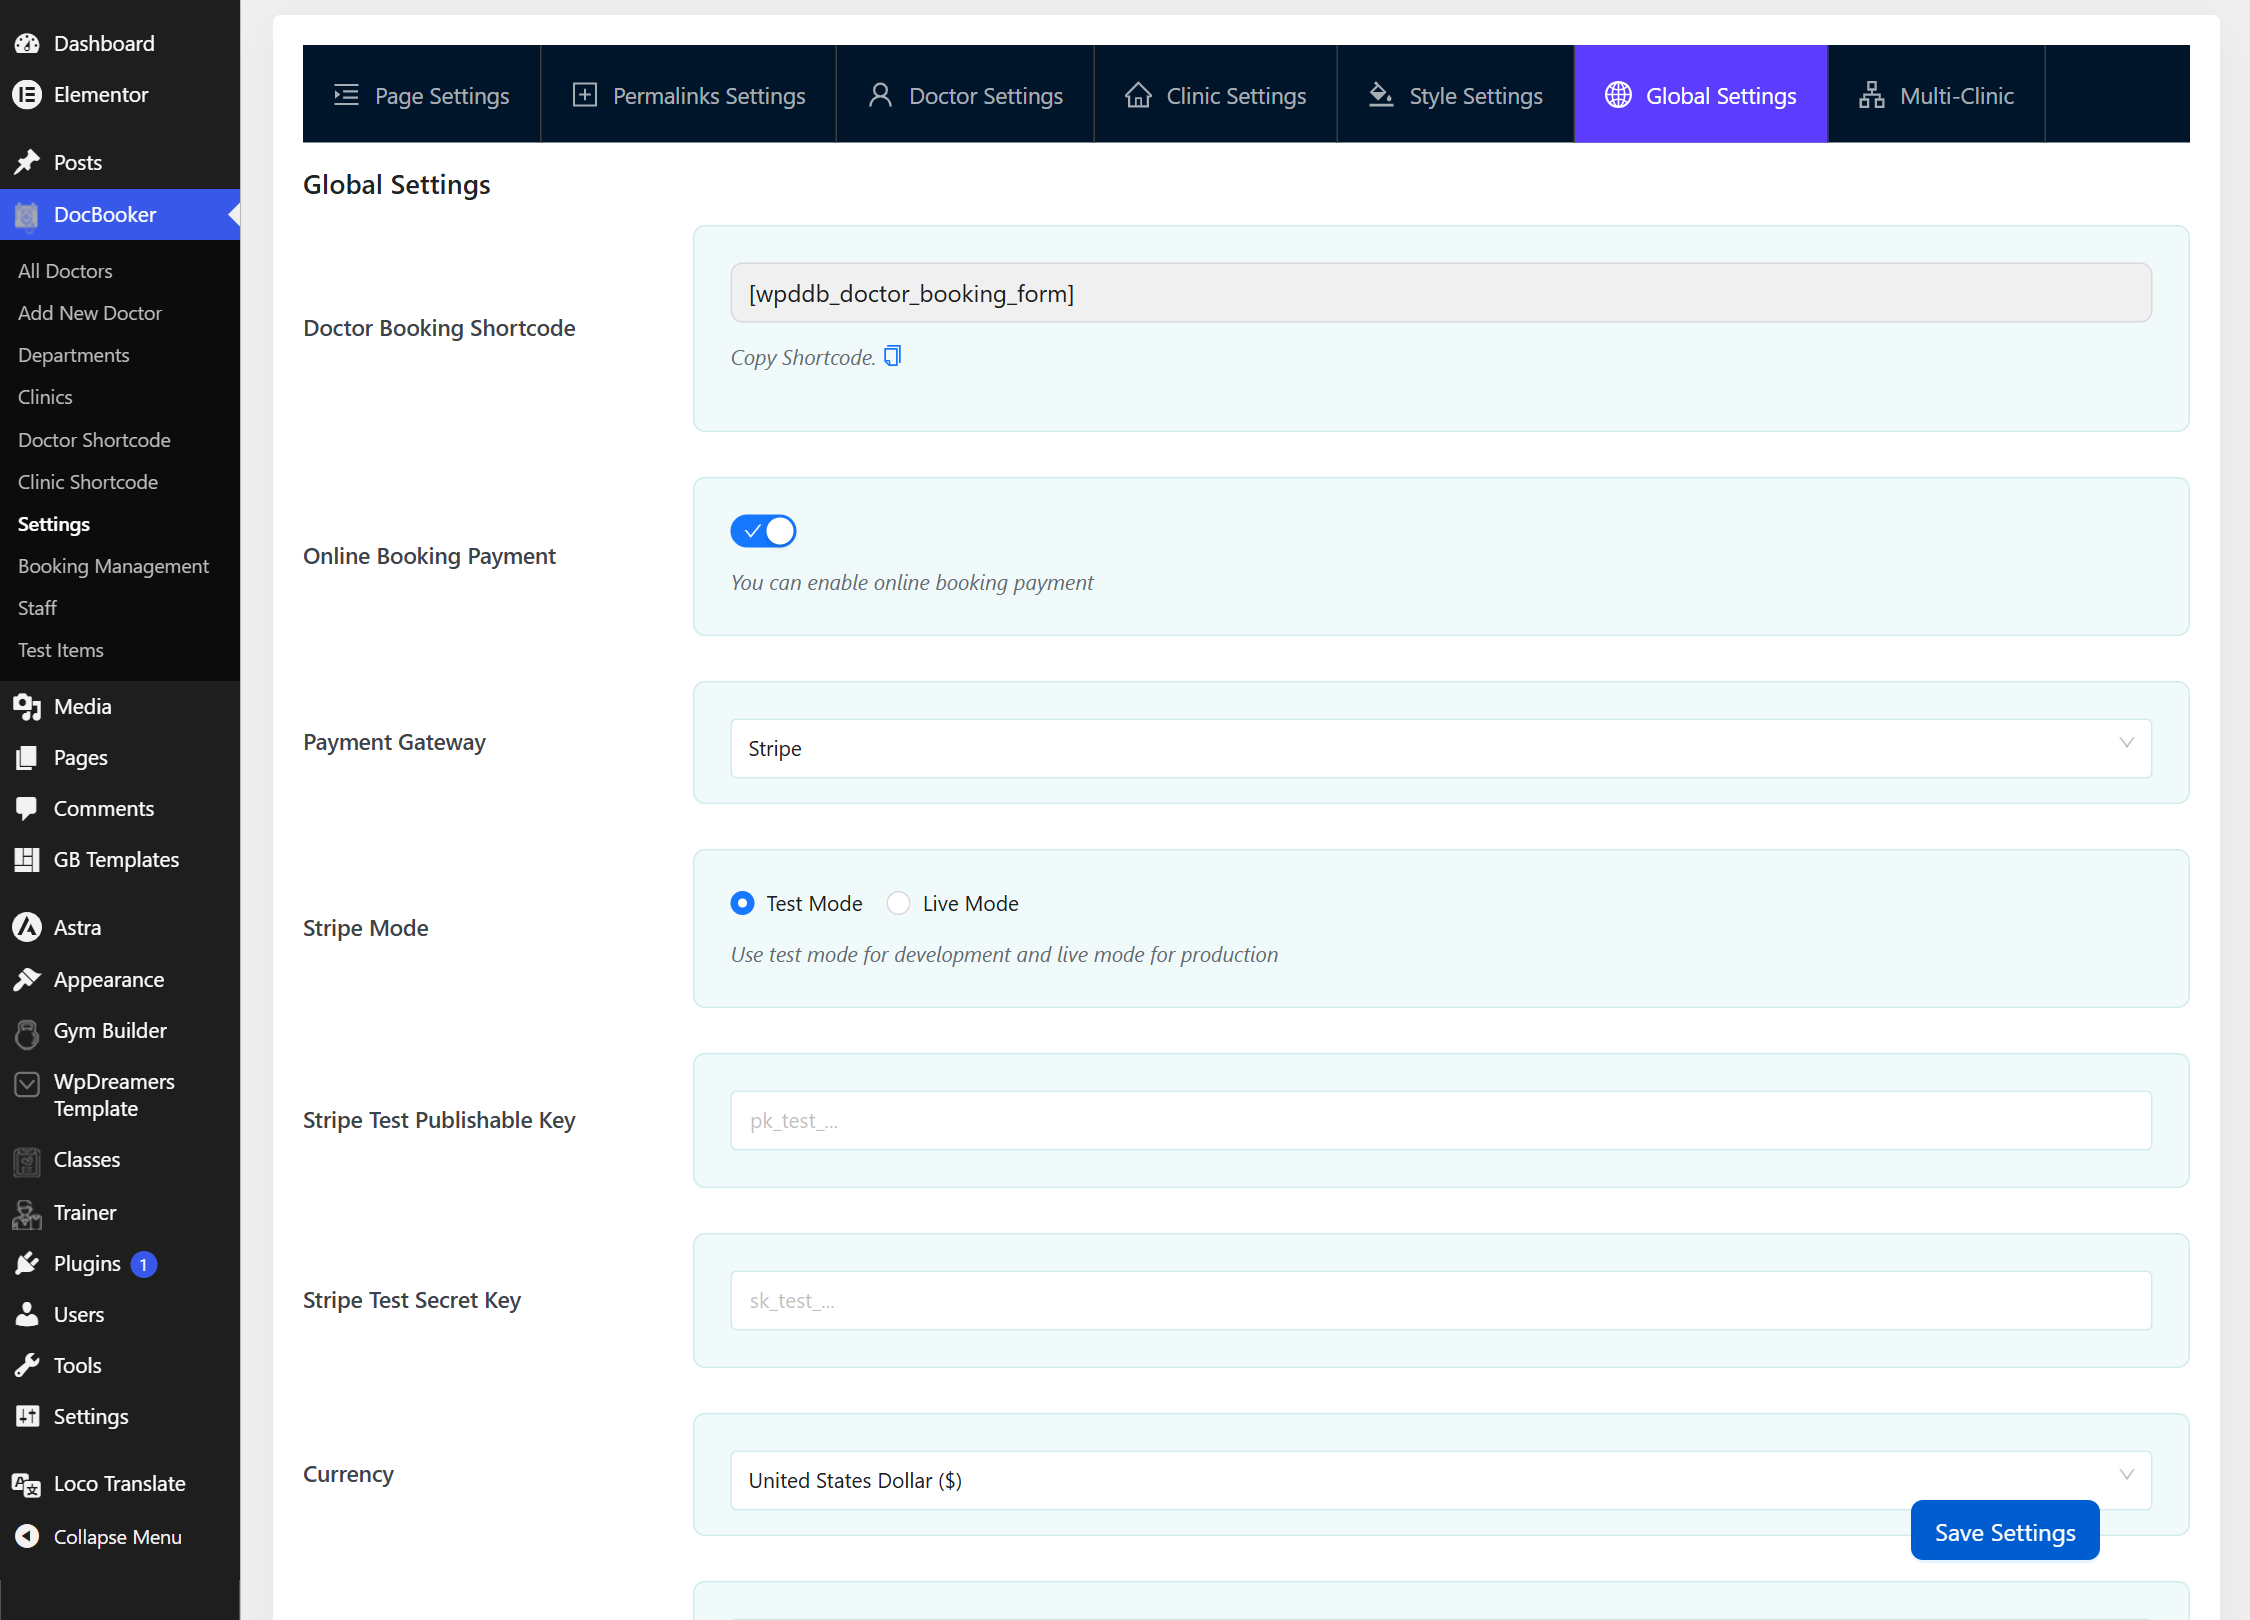
Go to DocBooker → Settings → Global Settings.
Turn on Online Booking Payment.
Choose your Payment Gateway — Stripe or Razorpay.
Pick Test Mode while you set up, then enter your publishable/secret keys.
Select your Currency and Save Settings. A payment step now appears in the booking wizard.
/wp-admin/ › DocBooker › Settings › Global Settings
Global Settings — enable payments, choose a gateway, set keys and currency.
Switch to Live Mode and enter your live API keys only when you’re ready to take real payments.
2
Multiple clinics & staff
Pro
Run several clinics from one site, each with its own data, and give front‑desk and manager staff exactly the access they need.
Open DocBooker → Staff to see all team members, with live stats (total staff, clinic managers, receptionists, active clinics).
Click Add staff to create a new user or attach an existing one, choose their role (Clinic Manager or Receptionist) and assign a clinic.
Use the Clinic Managers and Receptionists tabs, search, and Export to manage larger teams.
Each staff member’s data is scoped to their clinic, and last‑login is tracked for you.
/wp-admin/ › DocBooker › Staff
Staff manager — roles, clinics, status and one‑click Add staff.
/wp-admin/ › DocBooker › Clinic Managers
Assign clinic managers who oversee their location’s dashboard.
Smart login routing sends each role to the right place after they sign in — clinic managers to the Clinic Dashboard, receptionists to the Receptionist Dashboard.
3
The front‑end clinic dashboard
Pro
Clinic managers get a full front‑end control room — no wp‑admin needed — to run their location.
Make sure a page is set as the Clinic Dashboard Page (Getting Started, step 2).
When a clinic manager logs in, they’re taken straight to this dashboard.
From here they manage doctors, departments, schedules, holidays, clinic info, bookings, test orders and reports — all scoped to their clinic.
yoursite.com/clinic-dashboard
The Clinic Dashboard — a complete front‑end workspace per clinic.
4
Receptionist desk & visits (OPD/IPD)
Pro
The receptionist dashboard is where the front desk registers patients and runs visits — both walk‑in (OPD) and admitted (IPD).
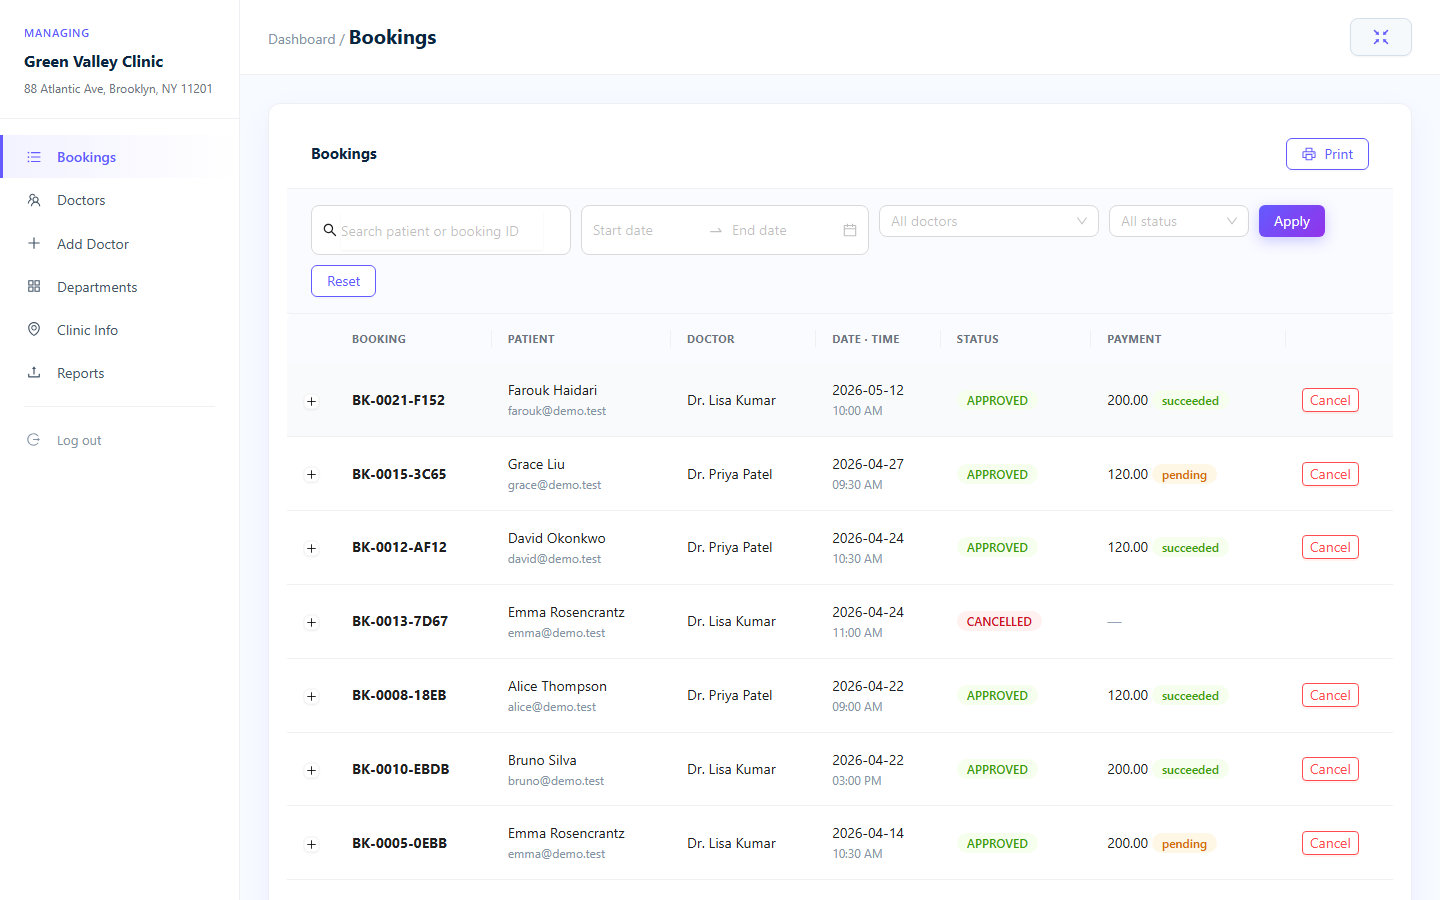
A receptionist logs in and lands on the Receptionist Dashboard Page.
They see the Visits list with each visit’s type (OPD/IPD), charges, paid amount, dues and status.
New patients get an auto patient code and computed age; start an OPD visit for out‑patients or an IPD visit for admissions.
For IPD, record the bed number and admit time — stay‑days are calculated automatically until discharge.
Click Manage on any visit to open its billing.
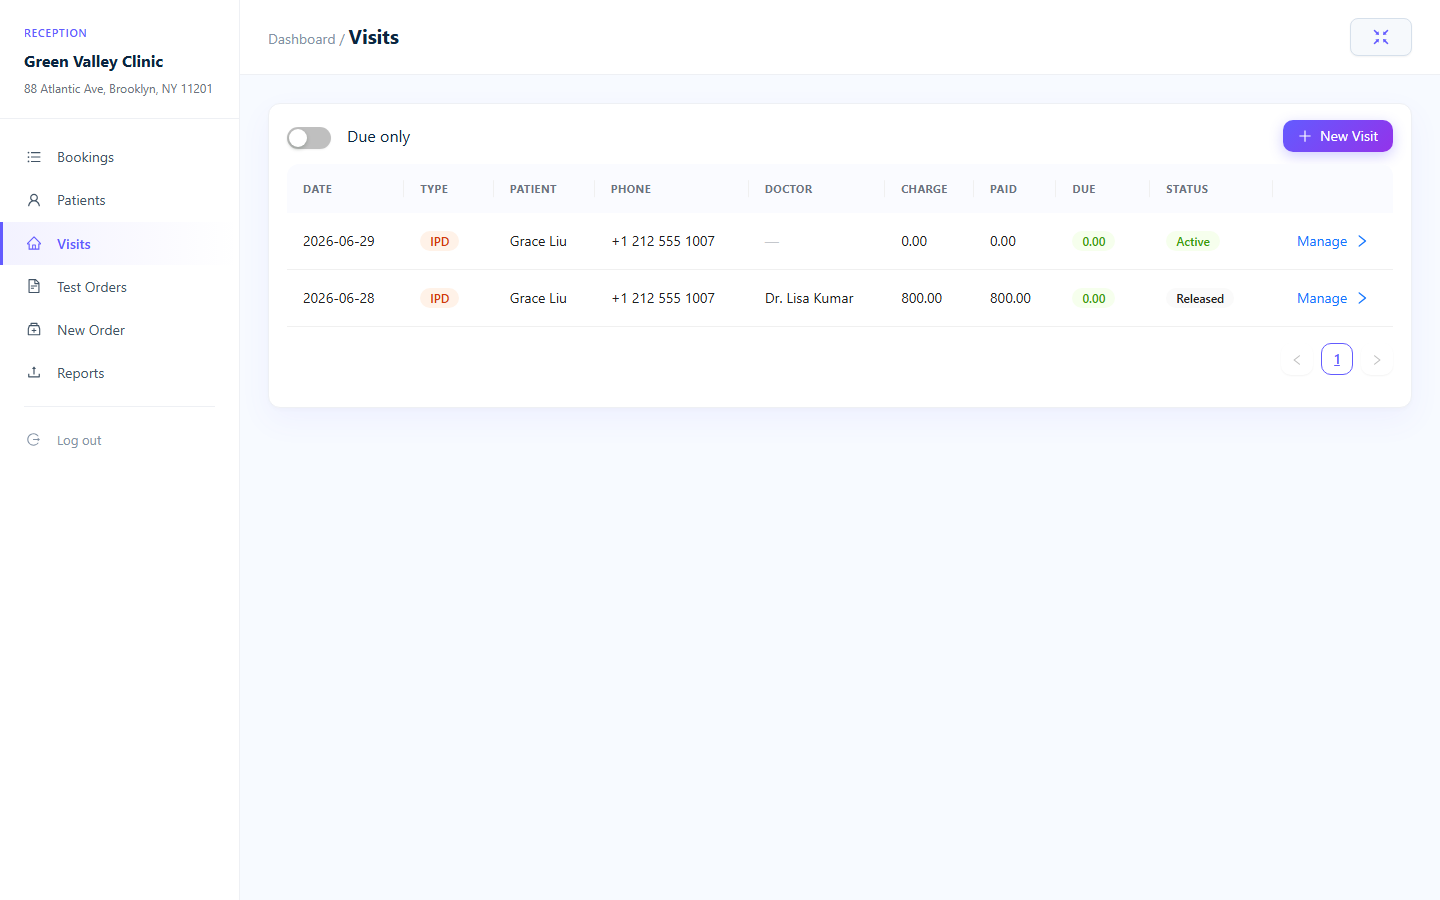
yoursite.com/receptionist-dashboard
Receptionist Dashboard — the Visits list with OPD/IPD, dues and status.
5
Itemised billing & printable invoices
Pro
Build a running bill for each visit from seven charge types, take part‑payments over several days, and print a professional, clinic‑branded invoice.
Open a visit and add line items — Consultation, Bed (per day), Medicine, Procedure, Test, Service or Other.
Record daily / partial payments (cash, card, mobile or other, with a reference). The live balance updates and the visit is tagged paid/unpaid.
While the patient is admitted, print an Interim Statement; on release, print the Discharge Invoice with a PAID stamp.
Both documents are secure, tokened print pages — no extra PDF plugin required.
Visit #4 › Running bill
The running bill — line items, dated payments and a live balance.
Discharge invoice · print
The printable discharge invoice, clinic‑branded with a PAID stamp.
Interim statement · print
An interim statement you can print any time during an admission.
6
Lab tests, orders & reports
Pro
Keep a catalog of tests and services, order them for patients, print a receipt with a portal QR code, and upload PDF reports for patients to download.
Go to DocBooker → Test Items and build your catalog — add items with a name, price, category and scope, or use Bulk Import to load them from CSV.
When ordering for a patient, search the catalog, set quantities, apply a line or flat discount, and generate an order code.
Print the receipt — it includes a QR code that links straight to the patient portal.
Upload the finished PDF report (up to 10 MB) against the order; an auto‑purge cron cleans up old files on your schedule.
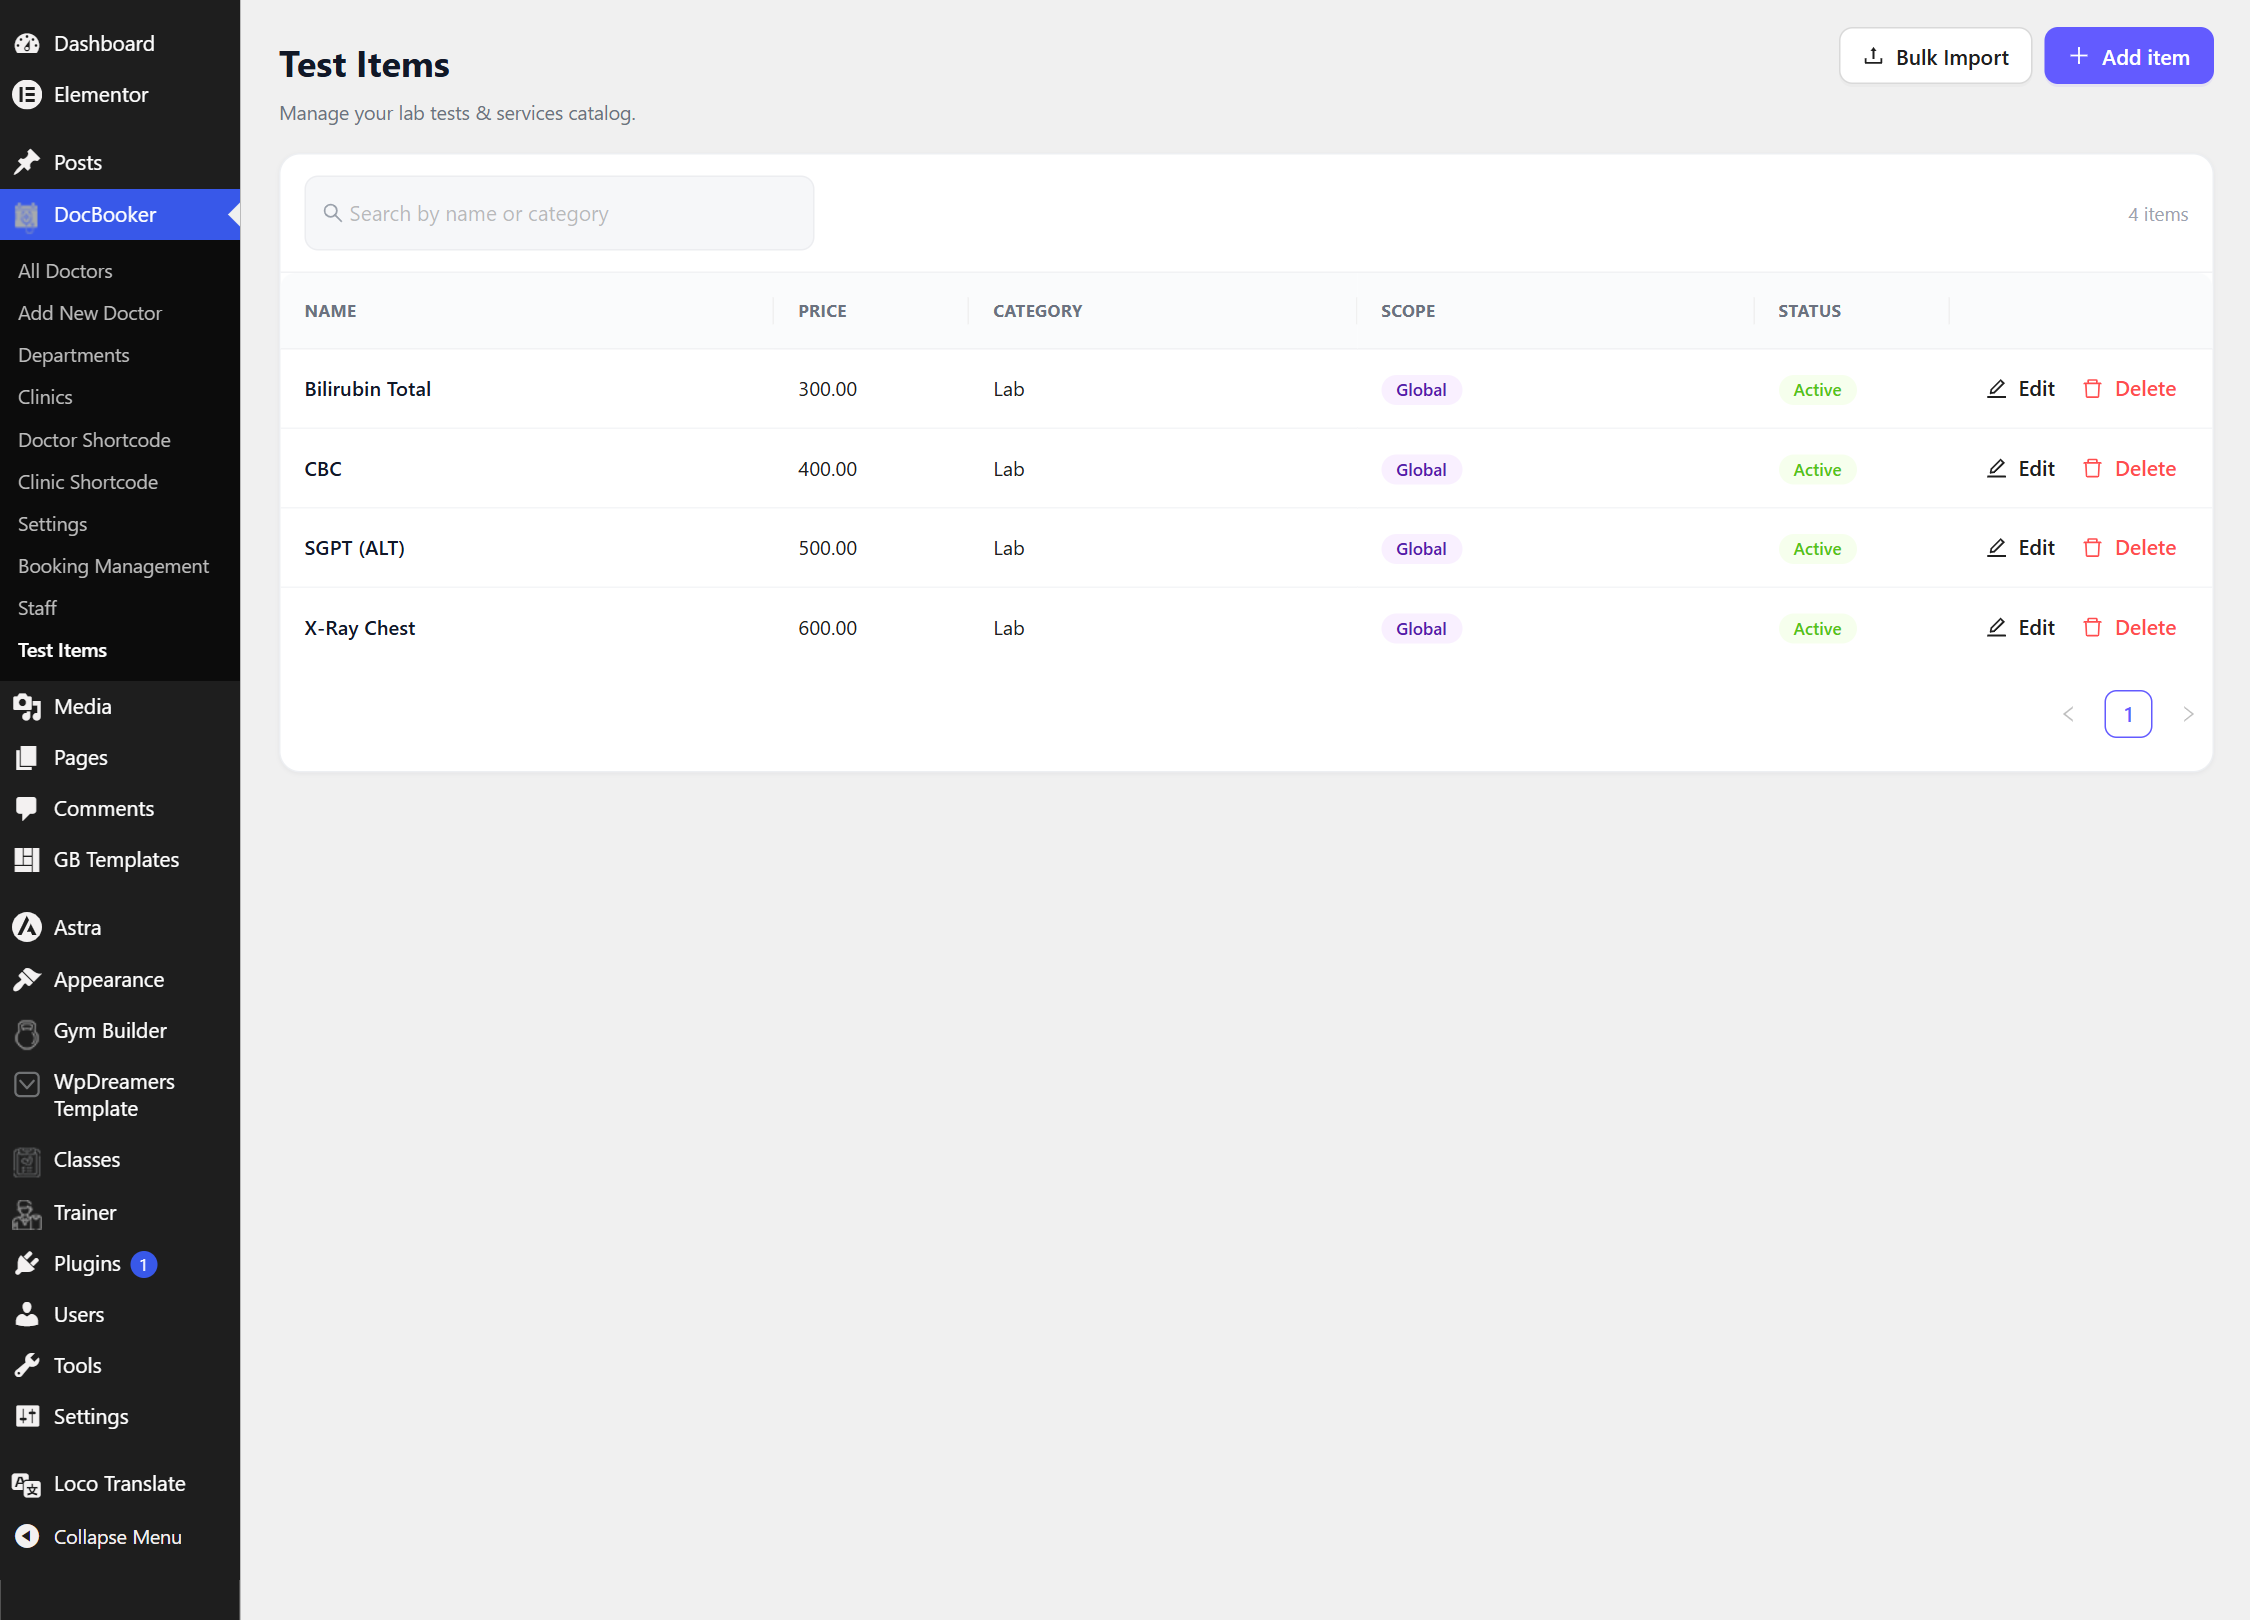
/wp-admin/ › DocBooker › Test Items
The Test Items catalog — manage lab tests & services, with Bulk Import.
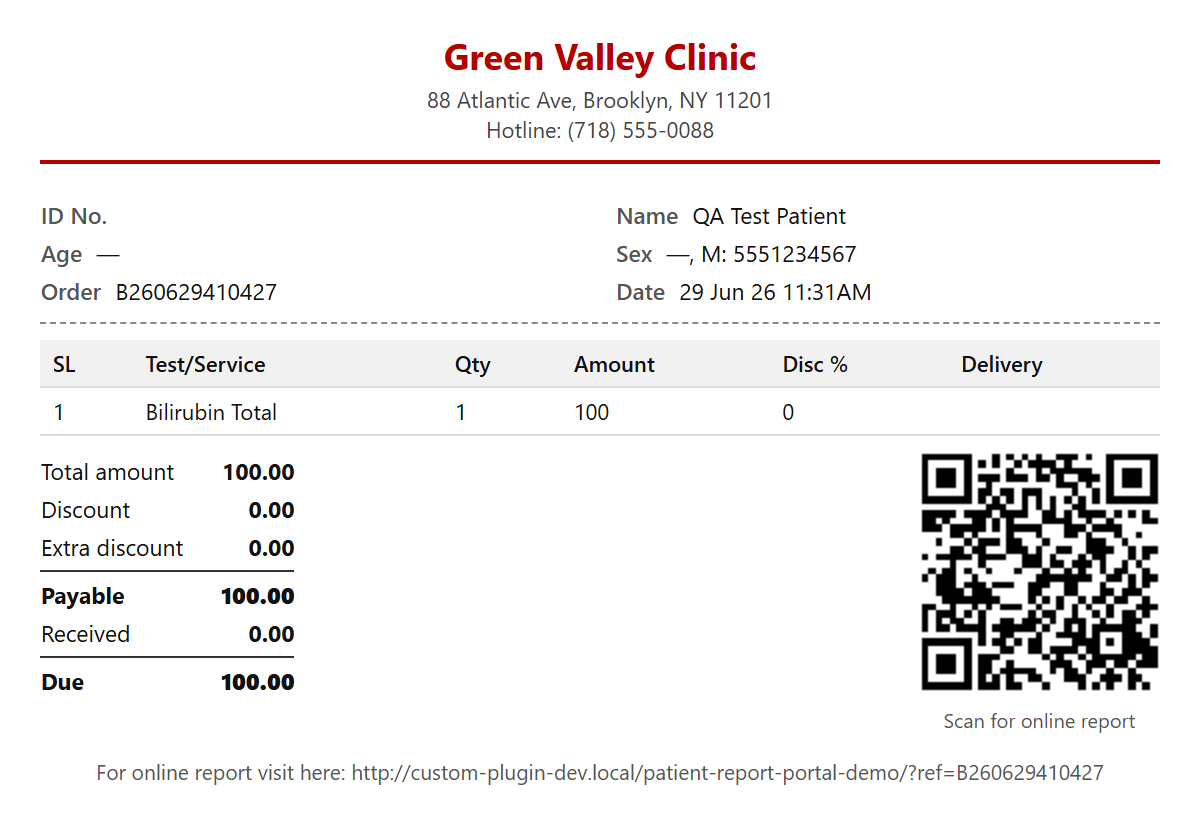
Test order receipt · print
The printable receipt — clinic‑branded, itemised, with a QR code the patient scans to open the report portal.
7
The secure patient portal
Pro
Patients view and download their lab reports themselves through a secure, password‑free portal — they just verify with a one‑time code.
Set a page as the Patient Report Portal Page (Getting Started, step 2).
The patient enters their phone number and order code (from their receipt or the QR code) and receives a one‑time password (OTP).
After verifying, they can view and download their reports via secure, expiring links.
Booking and OTP SMS templates (with merge tags) let you customise the messages patients receive.
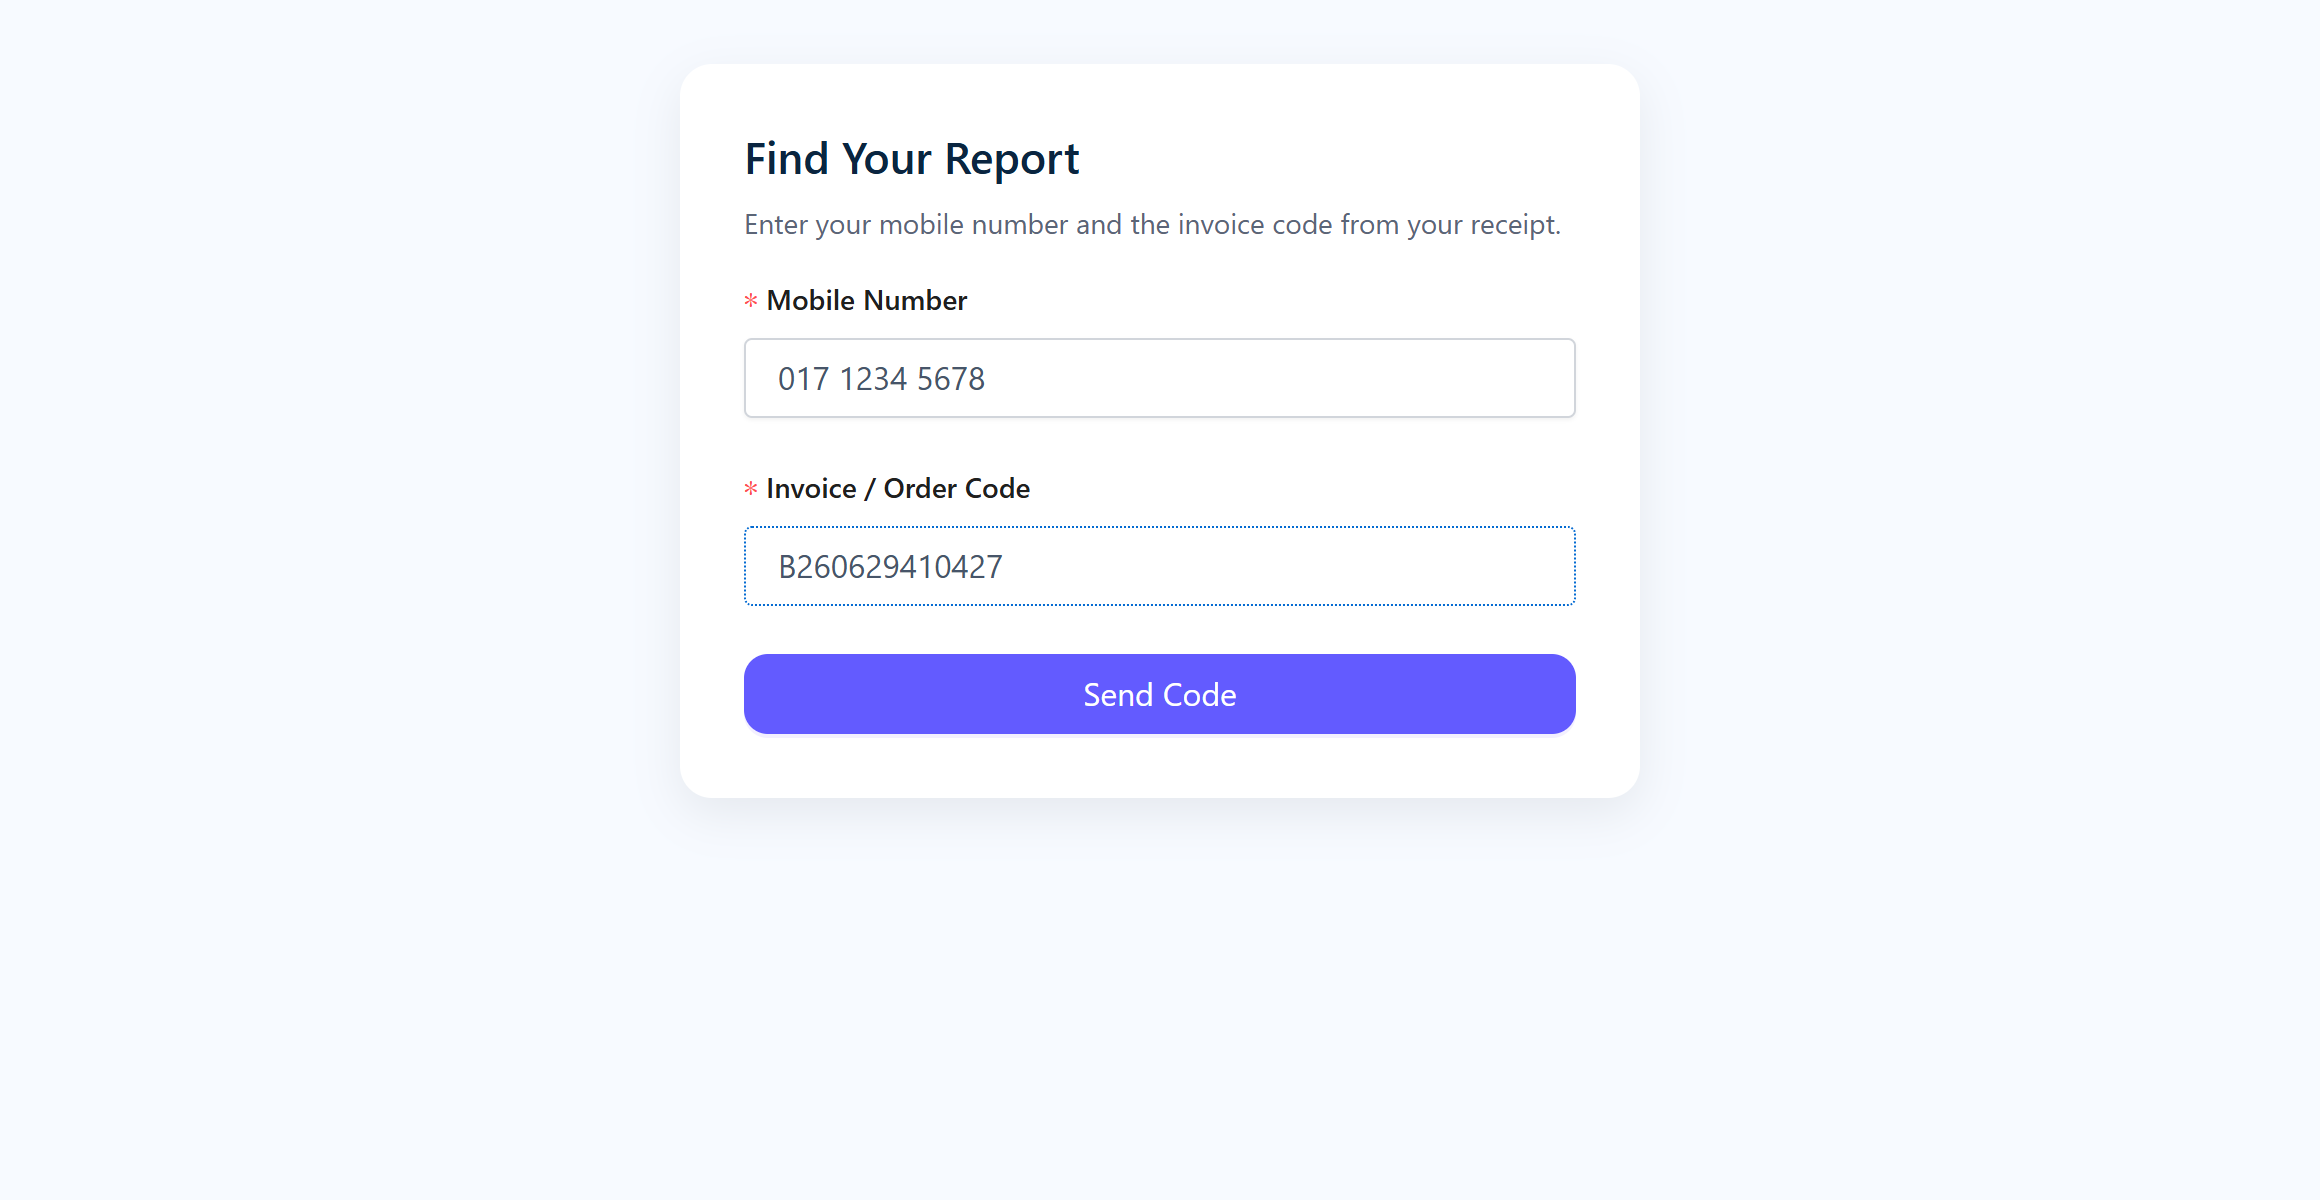
yoursite.com/patient-portal
The portal login — the patient enters their mobile number and order code, then taps Send Code to receive an OTP.
Privacy by design. Report links are signed and expiring, and the portal is enumeration‑safe — patients can only reach their own reports.
Pro · Page builder
Build pages with blocks & templates
DocBooker Pro ships 21 native Gutenberg blocks and 10 ready‑made site templates, so you can design a complete medical website — with real, live data — without touching code.
1
Use the Gutenberg blocks
Pro
The blocks live in the WordPress editor under the DocBooker Blocks category. Drop them on any page and they render your real doctors, clinics, departments and booking form — no dummy content.
Edit any page with the WordPress (block) editor and click the + inserter.
Search for a DocBooker block or scroll to the DocBooker Blocks category.
Insert a block — e.g. Doctors, Doctor Schedule or Booking Form.
In the block sidebar, choose a layout variant and options; the block pulls live data (and the active Stripe/Razorpay gateway for booking).
Publish. Everything stays in sync as you add doctors and clinics.
21
native Gutenberg blocks
Live
real doctor / clinic data — no placeholders
Multi
layout variants on every block
Layout & content
Hero ×5SliderWrapperAdvanced HeadingInfo BoxCall to ActionProcess StepsCountdownFAQTestimonials
The Doctors block — multiple card layouts, live data.
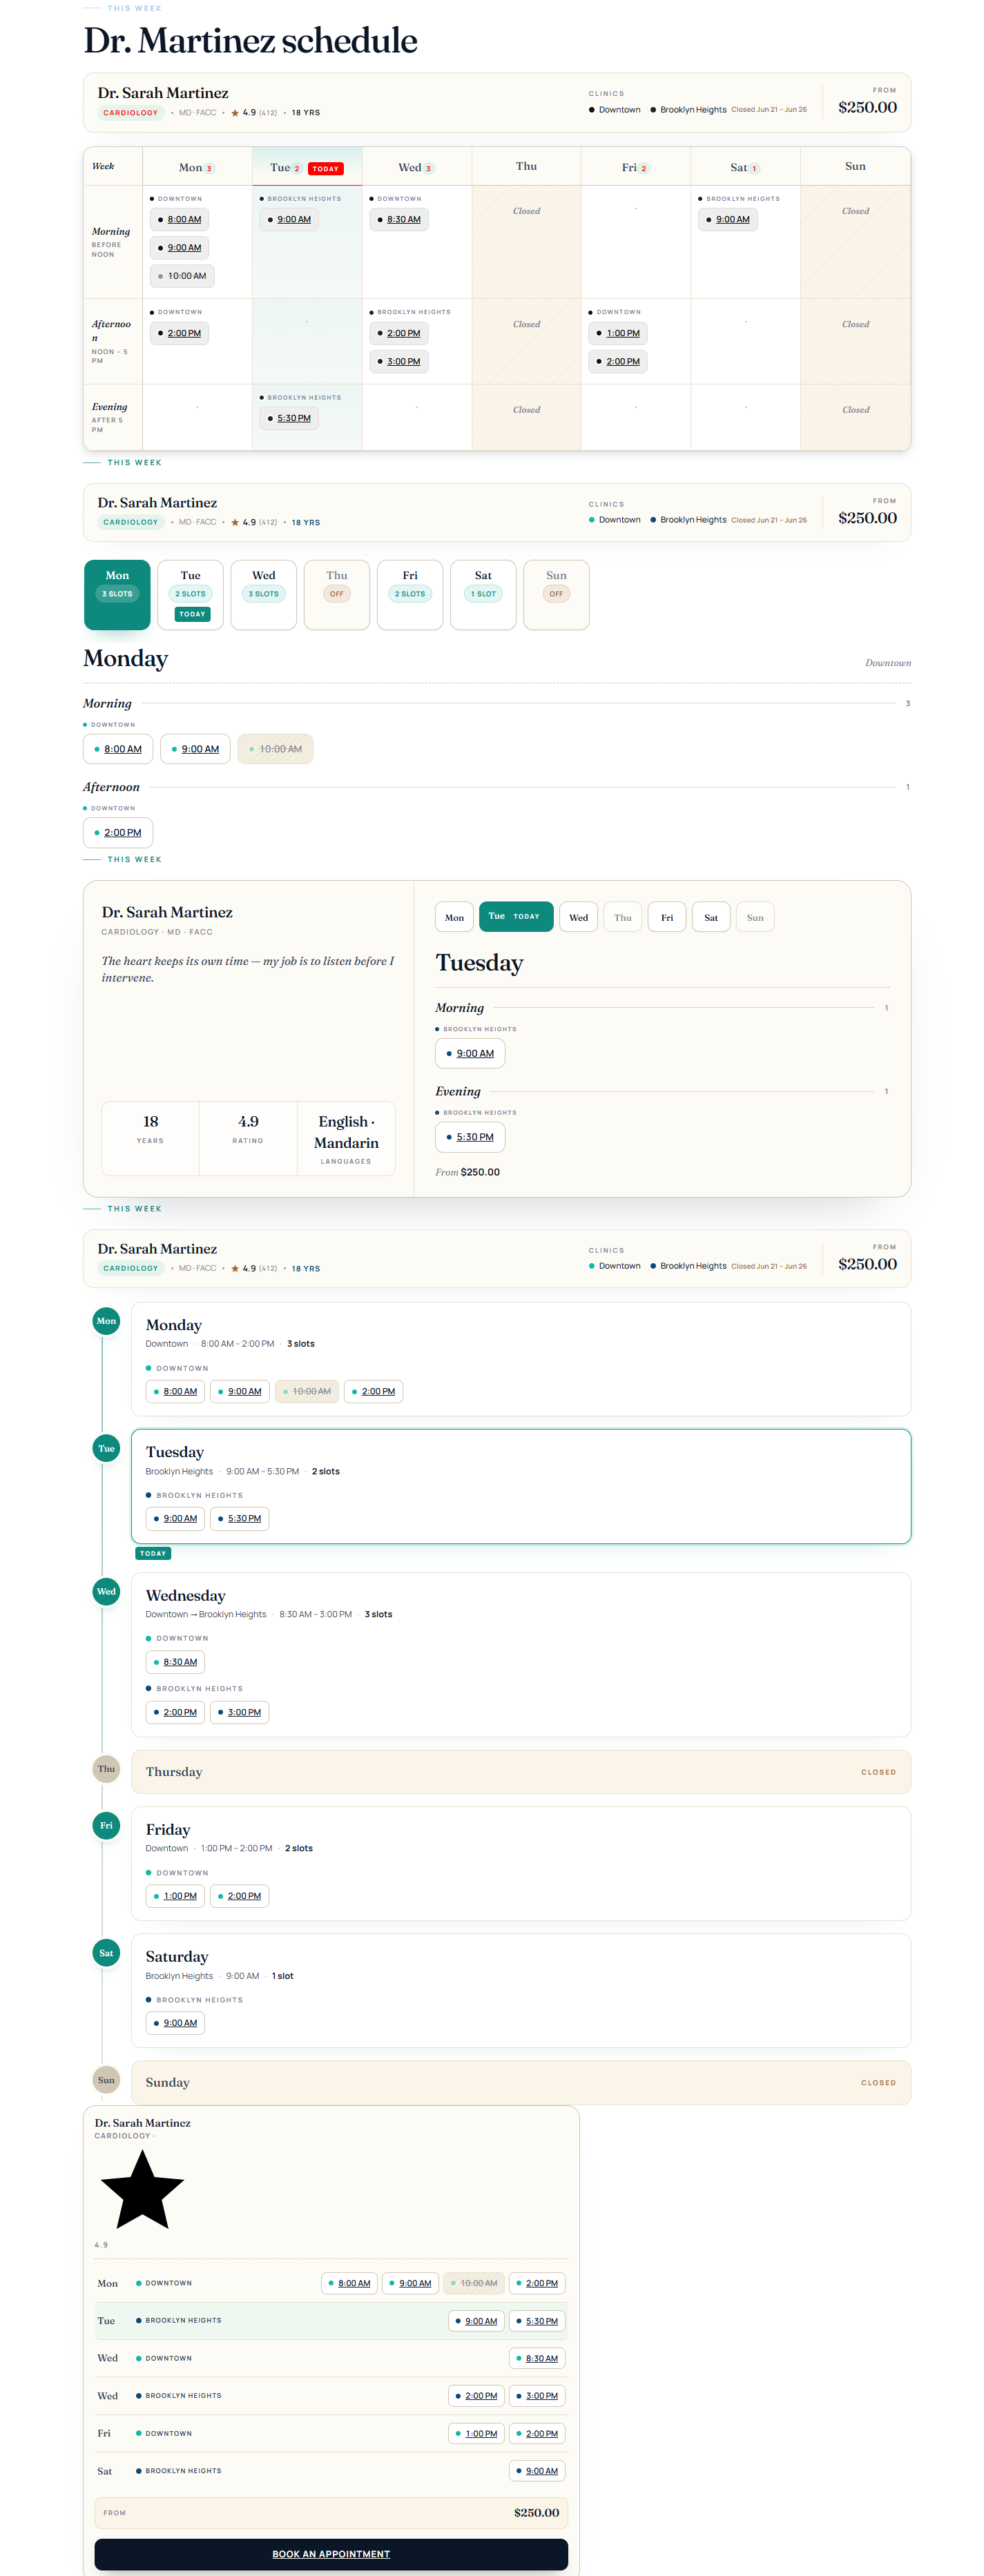
Editor · Doctor Schedule block
The Doctor Schedule block, in one of its layouts.
Editor · Booking Form block
The Booking Form block places the full wizard on any page.
2
One‑click ready‑made templates
Pro
Not sure where to start? Import a complete, niche‑specific homepage built from the blocks above, then edit it to make it yours. Every template is one click away.
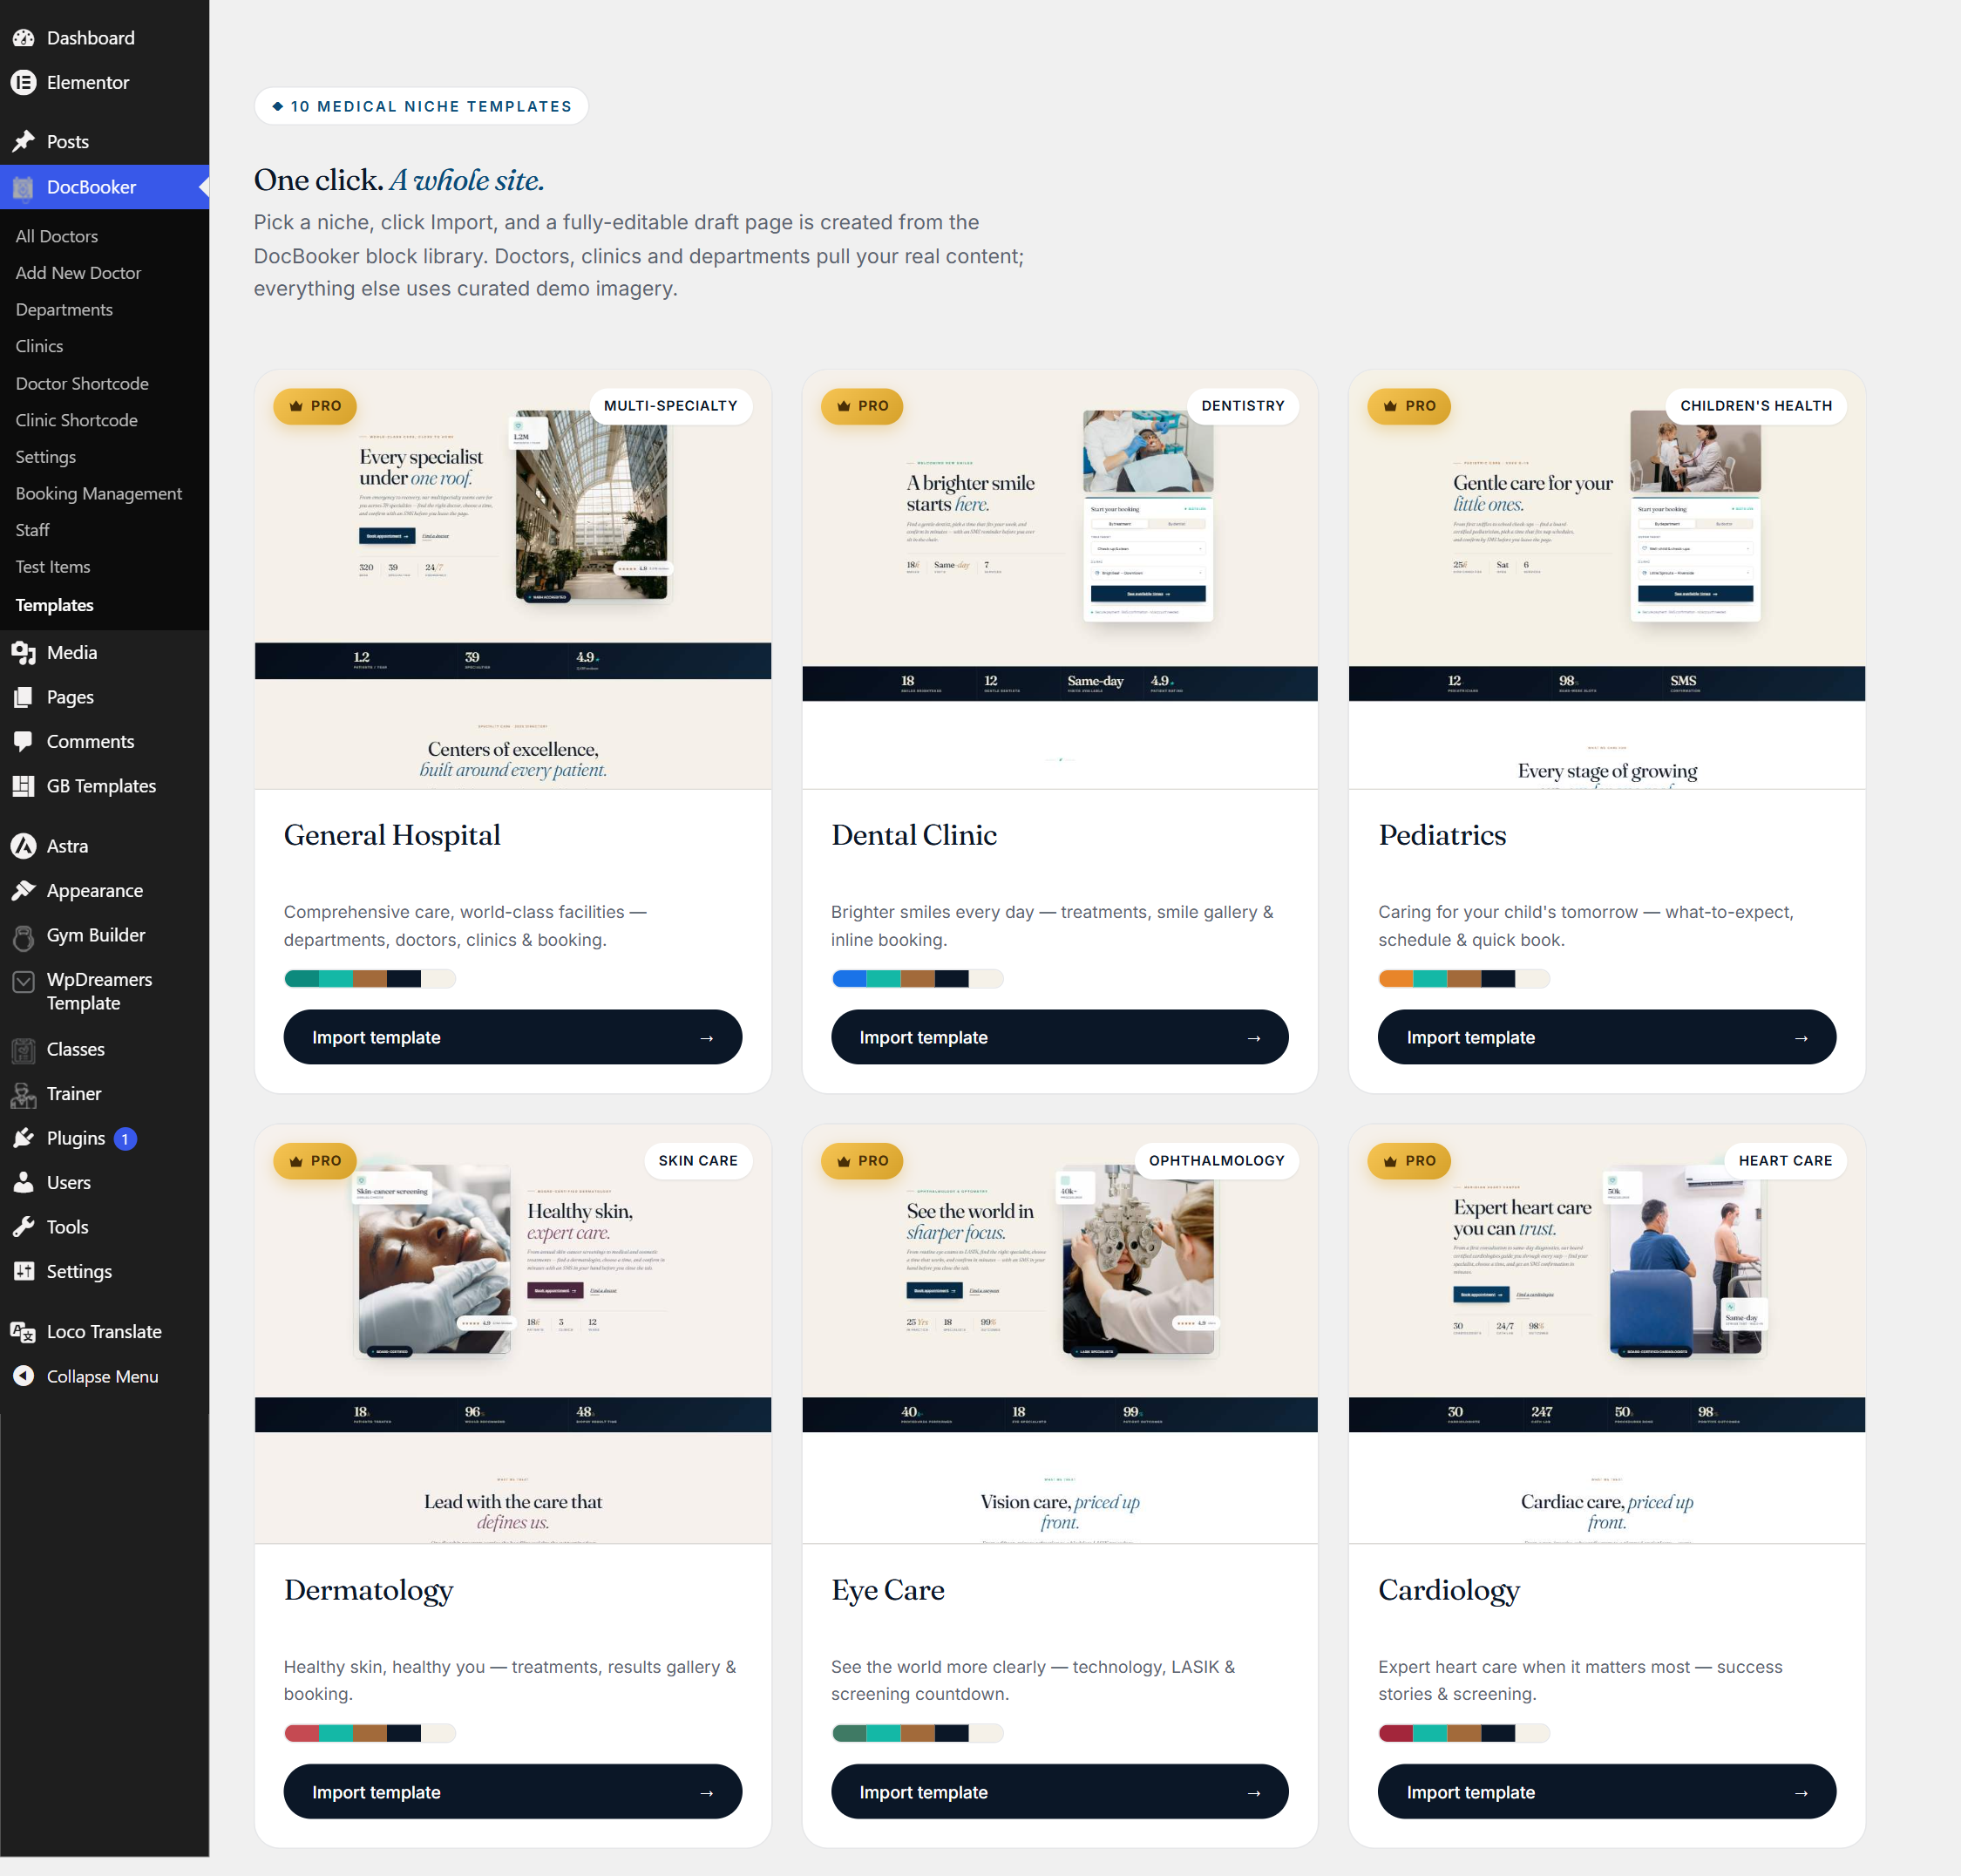
Go to the Templates library (the “Page Templates” screen). You can browse all 10 designs in the free plugin.
Pick a niche that fits your practice and click Import.
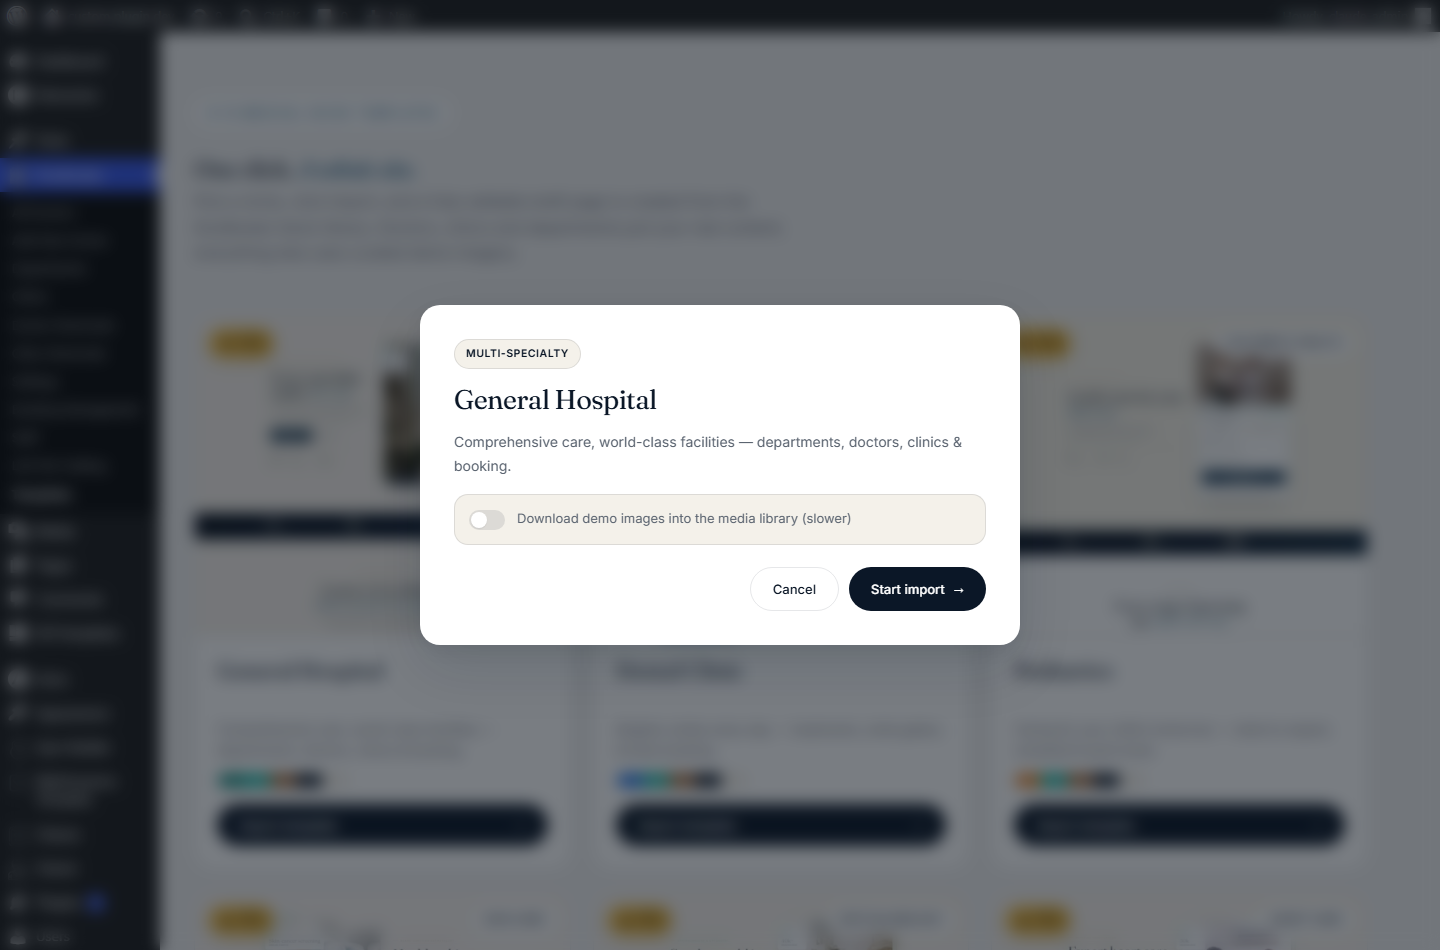
Confirm in the dialog — Pro builds a ready draft page from the DocBooker blocks (optionally sideloading demo images), with a theme‑aware full‑width layout.
Open the new page in the editor to customise text, images and blocks, then publish.
/wp-admin/ › Page Templates
The Templates library — browse 10 niches, each with an Import button.
Import · confirm
Confirm the import…
Import · success
…and you get a ready draft page with Edit and Preview links.
The 10 ready‑made designs
Each is assembled from the 21 blocks — import one and edit.
Multi‑specialty
Northvale General Hospital
A full hospital homepage with departments, doctors and booking.
Dentistry
BrightSmile Dental
A friendly dental practice site with services and appointments.
Children’s health
Little Sprouts Pediatrics
Warm, welcoming layout for a children’s clinic.
Skin care
Lumière Dermatology
An elegant skin‑care and dermatology clinic homepage.
Ophthalmology
ClearView Eye Care
A clean eye‑care center site with doctors and services.
Cardiology
Northvale Heart Institute
A trustworthy cardiology institute landing page.
Bone & joint
Apex Orthopedics
A confident orthopedics clinic homepage.
Wellness
Stillwater Mental Health
A calming mental‑health and wellness practice site.
OB‑GYN
Mariposa Women’s Health
A caring women’s‑health and OB‑GYN homepage.
Radiology
Meridian Imaging
A modern diagnostic‑imaging and radiology center site.
Reference
Free vs Pro at a glance
Everything in Free is included in Pro. Here’s what each unlocks.
and that the doctor has at least one bookable time slot in their Schedule. If styles look off, re‑save Settings → Style Settings so the CSS variables regenerate.
No dates are selectable on the calendar
The calendar only highlights weekdays that are enabled in the doctor’s Schedule, that aren’t inside a holiday range, and that still have free slots. Check all three in the doctor editor.
Do I need the free plugin if I have Pro?
Yes. DocBooker Pro is an add‑on that extends the free DocBooker plugin. Activate the free plugin first, then Pro.
Payments don’t appear in the booking wizard
Payments are a Pro feature. Enable Online Booking Payment in Settings → Global Settings, choose Stripe or Razorpay, and enter valid keys for the selected mode (Test or Live).
A staff member can’t see their dashboard
Confirm a page is assigned as the Clinic Dashboard / Receptionist Dashboard in Page Settings, and that the user has the correct role and clinic assigned under DocBooker → Staff.
Which themes does DocBooker work with?
DocBooker inherits your theme’s fonts and works with any well‑coded theme, with tuned support for Astra, Blocksy, GeneratePress, Kadence, Neve and Storefront.
Is DocBooker translation‑ready?
Yes — it ships a .pot file, so you can translate every string with a tool like Loco Translate or Poedit.
DocBooker & DocBooker Pro · by WP Dreamers — need a hand? Reach out through your account dashboard.